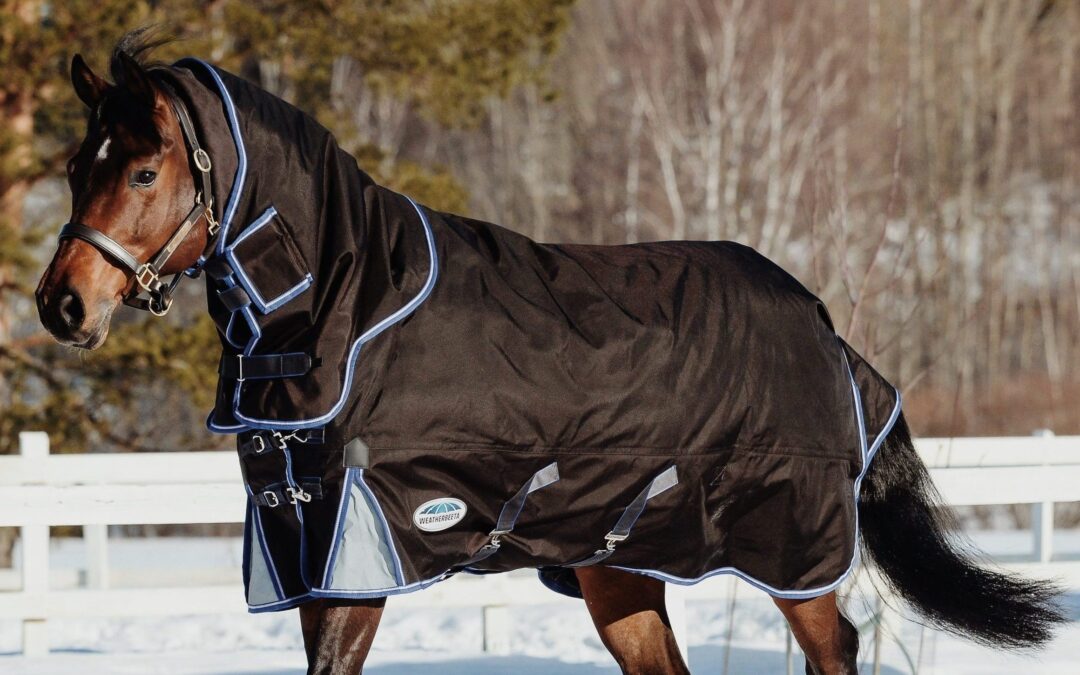
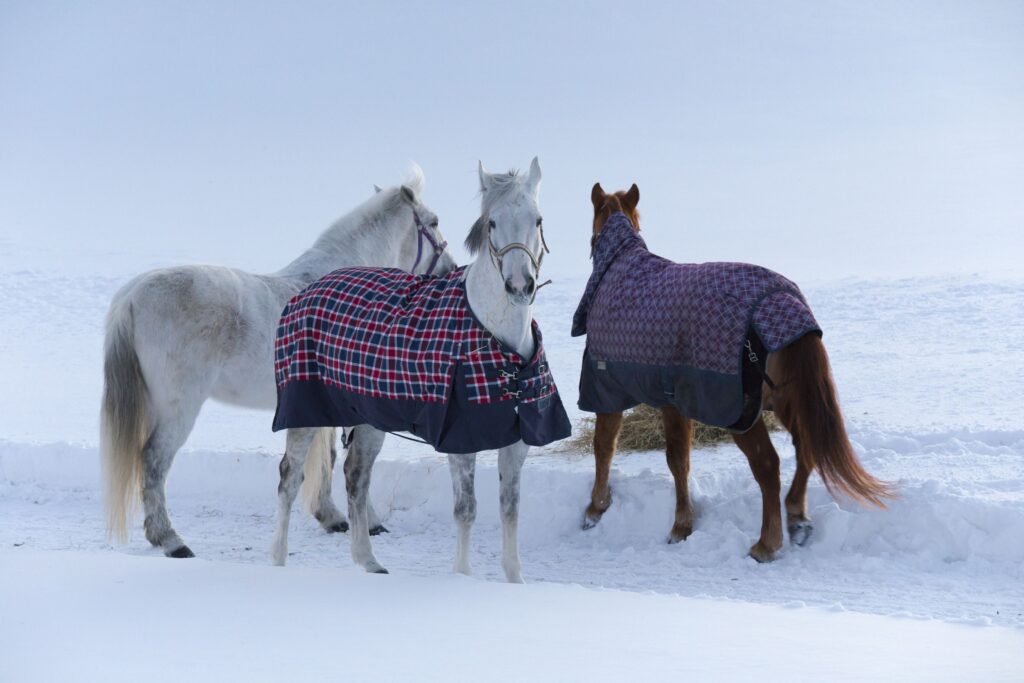
It’s blanketing time of year again! Where did summer go??
There are a lot of things to consider when it comes to blankets. Here are a few to ensure your horse stays warm and comfortable:
1- Is your horse turned out or kept in a barn? If he’s turned out, you’ll need a more durable canvas blanket especially if he is out with his buddies. It should also be waterproof as horses given their choice of being in or out, normally choose out, even if the weather is terrible. Also, whether they are in or out, pay attention to the temperature. If they sweat under a blanket, not only does the salt take a toll on their coat, but a damp blanket from sweat as the evening cools, can cause them to get chilled. . If you have a high denier count and it’s waterproof, it probably won’t breathe well so be sure to take it off during warm days.
2- If you have stickers or even shavings, a fleece lined blanket can be literally a pain as everything will embed itself into the fleece. It might be better to go with a canvas or nylon lining, though “loft” can help trap warm air and keep them more comfortable.
3- A good fitting blanket is very important. Don’t just use a previous horse’s blanket who was about the same size. If it’s too big, it’ll ride too far back and rub the horses withers on top, or hang way low on their chest in front. If it’s too small, they’ll rub the hair off in front of their shoulders. Most well known blanket manufacturers use a good cut so their blankets fit most horses well. My experience with cheaper blankets was usually a poor fit in the front.
4- Do you want to be able to take it off over their head and be able to adjust it in the front? That’s a nice option, just be sure to get one that has an easy to adjust front, so after a few weeks, it isn’t welded shut.
5- Are you going to use a hood for the winter? If so, be sure your blanket has 3 D-rings to attach it to or it’ll wiggle around all the time and probably rub their mane out.
6- Layers- I always preferred a sheet during the day and a blanket over the top of that at night. It cut down on chore time and kept them comfortable at most temperatures.
7- Do you use lights? This might need to be addressed in its own article, but keep in mind that when you keep a horse under lights their hair stays nice and slick, so they no longer can keep themselves warm enough. The same goes for horses that have been clipped. The more hair removed, the more blanket fill to consider using to compensate.
8- Forage – If the temperatures drop below the horse’s 41-degree thermoneutral zone, they will be using more energy to stay warm. This means, their normal calorie intake may not be enough and extra forage can help them maintain their body temperature. Plus, eating and digesting food creates heat.
9- Acclimation – Have you recently moved from the previous winter? Maybe you’ve moved someplace colder than the prior year and your horse needs to adapt to its new environment. A blanket can help them acclimate to the new climate.
10- And let’s not forget “sleezies”. They’re great, except for the poor folks who have to put them on and take the off! There’s a pretty good learning curve with sleezies.
Signs Your Horse is Too Hot
· Sweating – this can be under the blanket, along the neck, or behind the ears
· Heavy breathing
· Change in behavior – could be more lethargic or restless
· Rubbing the blanket to try and remove it
Signs Your Horse is Too Cold
· Shivering
· Tucked up tail to try and keep warm
· Seeking shelter or huddling up with other horses
· Change in behavior like pacing to try and warm-up
· Weight Loss – typically a more long-term sign that they’re too cold
A quick trick to check if your horse is comfortable is to place your hand under their blanket near their withers. Does it feel cool or too warm? If so, you can adjust your blanketing needs accordingly.
Those are my basic considerations when it comes to blanketing. It’s so nice when a horse doesn’t get too shaggy in the winter. That way when you ride, they don’t get so hot and dry off much quicker. However, if that’s not a consideration, letting them go “commando” is the easiest option. I noticed that the unblanketed horses always slicked off quicker in the spring.
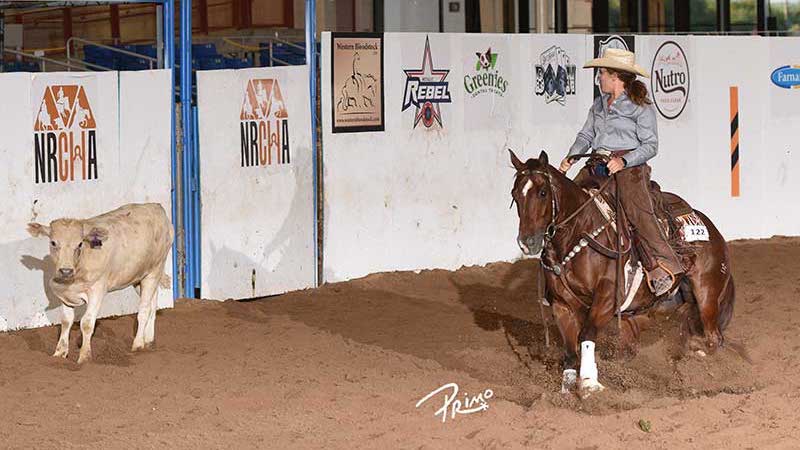
I was looking back on some past articles that Bill Enk (NRCHA Director of Judges and teller of great stories) has written for the NRCHA magazine and saw this. It’s so well written about the importance of reading a cow, that I thought I’d share it.
From the Judge’s Chair May 2022
Bill Enk on reading a cow
Everyone has their strengths and weakness when it comes to showing reined cow horses. Reading a cow accurately is a must. Sometimes luck is involved by drawing a perfect cow, but when that doesn’t happen, the showman that reads the cow the best has a definite advantage.
In the herd work, most people pick the cattle they want to work before they walk down to the herd. They have watched the cattle when the herd was settled and usually watch each rider before them cut so they know which cattle have been used and which are still fresh. Having a good idea about the behavior of the cattle to be cut goes a long way toward earning a good score.
Cutting in the center of the pen and staying even on both sides of a cow are a must for credit to be earned. How far to go by the cow to control and turn him is part of reading a cow accurately. Go too far, you might lose working advantage: don’t go far enough, the cow might not set up and turn, causing your help or the fence to turn him- no credit there.
The exhibitors that read the cow best know when they can play offense and when to play defense. If the cow is aggressively trying to get back to the herd, it’s time to be on the defensive. If the animal lets you control him in the middle of the pen, it’s time to play offense.
When the cow enters the arena during the cow work, the experienced showman starts sizing up the animal immediately. Some cattle head better than others, some are numb and won’t head at all, and some are a combination of both. The idea while boxing is to get on both sides of the cow to stop and turn it so when you get to the head on the fence, the animal will honor your horse and turn.
How long the animal is boxed has a lot to do with how the rest of the fence work plays out. Boxing too long takes too much juice out of the cow and the finish of the run is weakened. If you don’t box enough on an active animal, you risk not being able to catch and turn it on the fence and have a tough time finishing in control on the circles.
The #1 priority when judging the cow work is: Did the horse have position and control during the entire work? If they did, and had at least an average degree of difficulty, they should earn a good score. Reading the cow accurately allows the exhibitor to be consistent throughout the work and finish strong. Remember, using good judgement on a cow always gives you a fighting chance.
The NCHA is a little more forgiving than the other associations regarding adjusting your reins while showing, but also a bit more complex. Here goes:
3 point penalties are assessed if:
If the rider uses 2 hands to turn his horse around with the cow.
If 2 hands are used on the bridle reins to stop the horse then the rider allows the horse to turn on its own.
If 2 hands are used on the bridle reins while stopping the horse for a legal quit.
After quitting a cow legally, the rider uses 2 hands on the reins to turn his horse around or does so while in the herd.
If the cutter drops a bridle rein and uses his free hand to retrieve it while cutting the cow or working the cow it’s also a 3 pt penalty.
No penalty:
However, if the rider uses his free hand to retrieve the rein after legally quitting the cow and stopped their horse, there is no penalty.
The rider can untangle the reins with no penalty if it’s done after a legal quit and before entering the body of the herd, or while riding through the herd, the rider can place a second hand on the reins, behind the rein hand, to straighten them.
If after the rider turns to make a cut and stops in the body of the herd, a second hand can also be used to straighten the reins with no penalty.
Cheating the reins (ie making one shorter while only having the index finger between them) while cutting a cow is common practice and legal.
Be sure to practice adjusting your reins correctly at home until you get very dexterous with them!
I’ve never seen collection explained so well. I hope you enjoy this as much as I did!
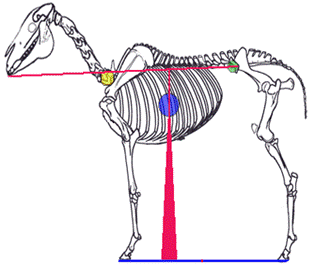
A horse’s weight is distributed over its haunches and forehand. However, because of the heavy head and neck, the horse carries a greater amount of its weight on its forehand. The horse’s center of gravity is located slightly above and behind its elbow (blue dot).
There is a belief that the front feet push against the ground in order to push the forehand upward and the body weightbackwardbut by watching correctly ridden horses and horse playing in nature, it becomes clear that this is not the case.
To improve the horse’s balance we need to encourage the horse to carrymoreof its weight with its haunches or, in other words, engage its haunches.
Equilibrium is maintained by controlling the body’s center of gravity over its base of support.
KEY FACTORS THAT CONTRIBUTE TO ENGAGEMENT OF THE HAUNCHES
The bending of the hind legs – When the horse is working in a relaxed manner and his back is elastically pulsating, the driving aids can be used to encourage pure impulsive ground covering strides, which in turn cause deeper bending of the joints of the hind legs.
The shortening of the base of support – In the beginning of the horse’s training, gymnastic exercises are used that increase the bending of the horse’s spine and the bending of one hind leg at a time. These exercises would include work on a single track such as circles, serpentines and other bent lines. Later, greater bending is developed with the use of shoulder fore and shoulder in. In more advanced training, exercises that bend both hind legs (stops, transitions, backing) are used. These gymnastic exercises encourage the more deeply bending hind legs to work further forward toward the horse’s center of gravity and shorten the horse’s base of support. This causes the forward impulse of the hind legs to travel through the horse’s body and act on the forehand in a more forward/upward direction. In addition, the shortening of the horse’s base of support shifts more weight to the haunches.
The lowering of the spine posteriorly – As the horse’s strength develops, the deeper bending of the hind legs causes the spine, which naturally slopes downward from the hips to base of the neck, to lower posteriorly. In exceptionally strong and well-conformed horses the point of the hip (green dot) can eventually lower to a point below the joint between the first thoracic vertebra (back) and last cervical (neck) vertebra (yellow dot). Because the horse’s spine is somewhat rigid, the horse’s haunches do not ‘sit’ independently from the forehand. Instead, this rearward spinal tilt shifts more weight onto the haunches. Bending of the haunches to this degree requires an extraordinary amount of strength and suppleness.
The elastic tension of the lifter muscles – As the horse’s muscles alternately flex and relax more deeply, the bending of the hind legs and shortening of the base of support create an elastic tension (not to be confused with tightness or constriction) in the muscles and ligaments that connect the haunches to the forehand. This elastic tension helps to lighten the forehand in a kind of cantilever action.
Natural raising of the neck – The elastic tension of the muscles and ligaments bring the horse’s neck up into a graceful arch, with the poll balancing as the highest point and the head hanging naturally by gravity from an elegant upward/forward reaching neck.
The horse naturally raises its mouth to a point approximately level with its hip and its face approaches the vertical. This naturally offered posture allows the rein aids to travel freely through each vertebra, through the pelvis, down to the hind pastern joints. With the neck stretched upward and the poll carried poised like a ballet dancer, the heavy weight of the head and neck is shifted toward the haunches, making it easier for the back to lift the forehand and the hind legs to carry the weight.
In the piaffe, the combined center of gravity of the horse and rider is directly over the center of the horse’s base of support.
Relaxing and bending isthe key factor that enables the hind legs to bend more deeply under the increased weight. Engagement becomes easier for the horse as it gets stronger and its balance is refined. As the horse willingly relaxes into the work it will naturally offer to bend its hind legs as much as it is able. As the horse relaxes and settles onto its hind legs, the hips and stifles bend even further. Again, this shortens the base of support and further lowers the spine posteriorly and naturally continues to draw the head and neck into a position that enhances the horse’s balance. The haunches are methodically strengthened until the forehand can be easily lifted completely off of the ground and the horse can momentarily settle onto its hind legs.
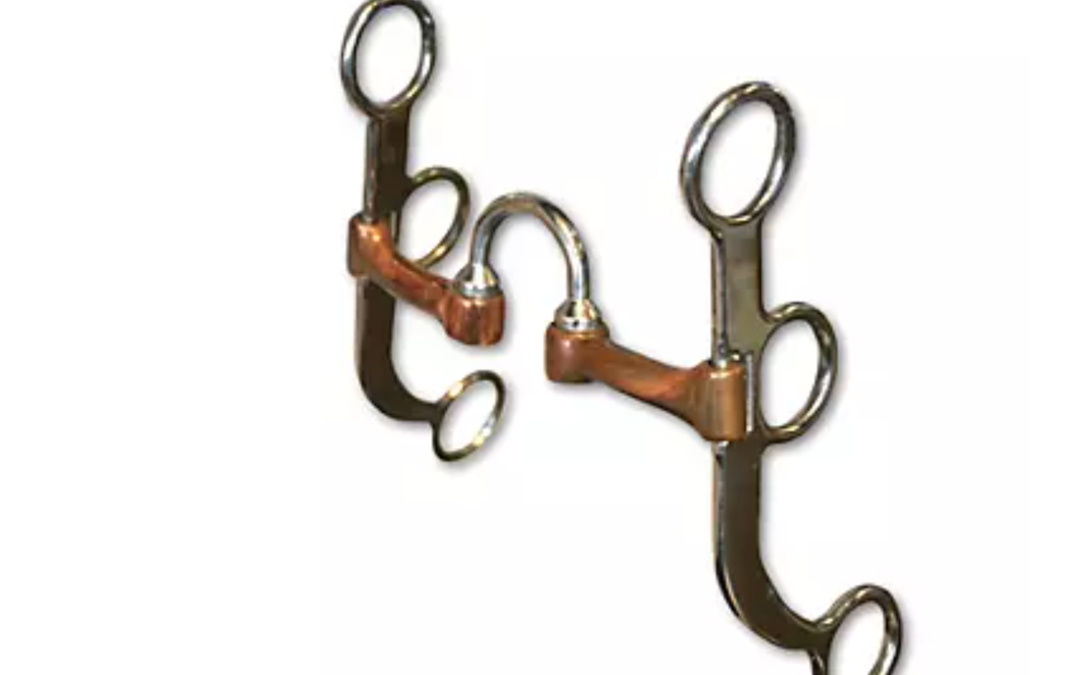
I want to talk a little about bits in this week’s article, because it’s a subject that is difficult to get good information about and because of this, Barb and I are doing a webinar next week combined with how to develop soft hands and feel (no, you don’t have to be born with those!).
Whatever choice we make regarding the bit we’re using, we all want to communicate clearly with our horse, building confidence and trust.
It’s more about how you use your equipment than what equipment you use. Certain bits work better at certain levels of a horse’s training, but more important is that we’ve laid a strong foundation so the horse understands what’s being asked and can physically and mentally respond correctly.
As a trainer, I had a far smaller collection of bits than most. However, when I succumbed to buying the latest gimmick, it didn’t take long for it to be relegated to the back of my tack room to collect dust.
Bits are tools and our true connection comes from our seat, legs, and breathing with our hands playing a secondary, supporting role.
Bits shouldn’t be used as a punitive measure nor resorted to in frustration. The reason we advance from a non-leverage bit (snaffle) to a leverage bit should be that the basics have all been solidly put into place and now we want to refine our horse’s skills in whatever discipline we choose.
If there are holes in your horse’s foundation, don’t think a bigger bit is going to fix them. Graduating to the next bit should be to fine-tune our horse by increasing their sensitivity to us and helping them become more accurate and responsive.
I hope you’ll join us on Dec 5th and 7th at 5:00 PST.
It’s blanketing time of year and there are a lot of things to consider when it comes to blankets. Here are a few to ensure your horse stays warm and comfortable:
1- Is your horse turned out or kept in a barn? If he’s turned out, you’ll need a more durable canvas blanket especially if he is out with his buddies. It should also be waterproof as horses given their choice of being in or out, normally choose out, even if the weather is terrible. Also, whether they are in or out, pay attention to the temperature. If they sweat under a blanket, not only does the salt take a toll on their coat, but a damp blanket from sweat as the evening cools, can cause them to get chilled. If you have a high denier count and it’s waterproof, it probably won’t breathe well so be sure to take it off during warm days.
2- If you have stickers or even shavings, a fleece lined blanket can be literally a pain as everything will embed itself into the fleece. It might be better to go with a canvas or nylon lining, though “loft” can help trap warm air and keep them more comfortable.
3- A good-fitting blanket is very important. Don’t just use a previous horse’s blanket who was about the same size. If it’s too big, it’ll ride too far back and rub the horses withers on top, or hang way low on their chest in front. If it’s too small, they’ll rub the hair off in front of their shoulders. Most well-known blanket manufacturers use a good cut so their blankets fit most horses well. My experience with cheaper blankets was usually a poor fit in the front.
4- Do you want to be able to take it off over their head and be able to adjust it in the front? That’s a nice option, just be sure to get one that has an easy to adjust front, so after a few weeks, it isn’t welded shut, but not so easy that it comes undone while they’re out playing.
5- Are you going to use a hood for the winter? If so, be sure your blanket has 3 D-rings to attach it to or the hood will wiggle around all the time and probably rub their mane out.
6- Layers- I always preferred a sheet during the day and a blanket over the top of that at night. It cut down on chore time and kept them comfortable at most temperatures.
7- Do you use lights? This might need to be addressed in its own article, but keep in mind that when you keep a horse under lights their hair stays nice and slick, so they can no longer keep themselves warm enough. The same goes for horses that have been clipped. The more hair removed, the more blanket fill to consider using to compensate.
8- Forage – If the temperatures drop below the horse’s 41-degree thermoneutral zone, they will be using more energy to stay warm. This means, their normal calorie intake may not be enough and extra forage can help them maintain their body temperature. Plus, eating and digesting food creates heat.
9- Acclimation – Have you recently moved from the previous winter? Maybe you’ve moved someplace colder than the prior year and your horse needs to adapt to its new environment. A blanket can help them acclimate to the new climate.
10- And let’s not forget “sleezies”. They’re great, except for the poor folks who have to put them on and take the off! There’s a pretty good learning curve with sleezies.
Signs Your Horse is Too Hot • Sweating – this can be under the blanket, along the neck, or behind the ears • Heavy breathing • Change in behavior – could be more lethargic or restless • Rubbing the blanket to try and remove it
Signs Your Horse is Too Cold • Shivering • Tucked up tail to try and keep warm • Seeking shelter or huddling up with other horses • Change in behavior like pacing to try and warm-up • Weight Loss – typically a more long-term sign that they’re too cold
A quick trick to check if your horse is comfortable is to place your hand under their blanket near their withers. Does it feel cool or too warm? If so, you can adjust your blanketing needs accordingly.
Those are my basic considerations when it comes to blanketing. It’s so nice when a horse doesn’t get too shaggy in the winter. That way when you ride, they don’t get so hot and dry off much quicker. However, if that’s not a consideration, letting them go “commando” is the easiest option. I noticed that the unblanketed horses always slicked off quicker in the spring.
I was recently asked a couple of questions for an article on judging for the Reined Cow Horse Training Online that I thought it would be fun to share and get you all to weigh in on.
What are some of the biggest mistakes you see people make in the show pen?
I said, “Not taking advantage of the things the rider has control over. In the reined work for instance missing the middle of the arena on your circles, not making your big ones faster than the small ones, not running to the stop, and being sure you get past the markers before stopping are high on my list. In the fence work it would be allowing there to be separation between you and the cow (ie losing some position and control), and not taking advantage of earning credit by also rating the second direction down the fence. In the herd work it’s hard to earn credit unless you cut and quit in the middle of the pen and cover both sides of the cow while working.” So if you want to maximize your score, you’ll need to do those little things. They sure add up and are under your control.
What is the one thing you wish you could tell everyone before they walk into the arena?
I answered, “Relax and have faith in your training. Take a deep breath and let your horse do its job. If you have a horse that can mark a 72, don’t try to mark a 74 (because more than likely, you’ll end up a 64). Ride the horse you’re riding.”
And last, I was asked what I would say to the person who grumbles about their score?
That was an easy one! “Go watch the video with somebody who really knows and who will be honest with you. If you still disagree with the score and you can put your “humble hat” on, I think at a weekend show that it’s ok to ask the judge after the show is over, how you might improve your score.”
I also encourage everyone to take advantage of the NRCHA Judges Seminars. You can learn so much there about what the judges are looking for and how to take advantage of credit earning opportunities.
I’d really like to hear how you all feel about this, so please share. And if there’s anything you want more information about, let me know. If I can answer it I will, and if not, I’ll get someone who can.
I wanted to share one of my most favorite exercises for suppling a horse.
I also use it to help them make the right choices by offering it as a more difficult alternative to their current “choice”, if that choice is not what I want them to be doing.
Let’s say for instance your horse doesn’t want to stand still. Every time he moves a foot, you softly pick up the reins and back him in a circle (as the videos below show) with his nose and butt to the inside.
This is very difficult for them, it’s hard work.
After you back a few circles, stop, pat him and drop the reins, giving him the “opportunity” to move his feet again. When he does, quietly pick up the reins, soften his face and back him around some more.
The beauty of this exercise is that it’s a lot of work and as soon as they put it together that every time they move their feet, they have to work, pretty soon they don’t want to move their feet.
It’s their choice and that’s why it works. You’ve stacked the deck in your favor and the house always wins!
And meanwhile, he’s gotten much softer and more supple and thoughtful.
So, it’s a win-win-win, which is the best kind of win.
I get a lot of questions about how to hold the 2-rein outfit. There are a few different ways, so I’m going to go over each.
The great thing about the year spent in the 2 rein (during which you can also show your horse straight up in the bridle) is that’s it’s legal to put your fingers between the reins! I used to show my horses in both the 2 rein class and the open bridle on the same day so I could school in one and show in the other.
Here’s a photo of the easiest way. In this, you hold everything together in one hand. However, when you do this, you don’t take advantage of using your fingers between the reins.
This one is my favorite. You put one finger between each of the 4 reins and then turn your thumb up.
Some folks like to have the romal reins come up through their palm from the bottom up as if you were straight up in the bridle and the mecate reins would be held going from top to bottom.
Here’s a photo of putting your fingers in a position to help guide your horse as needed.
It’s a lot to manage, but hopefully, this is helpful!
You’ve probably seen one of those incredible “show car” paint jobs – where the smooth, rich color looks as if it’s 10 feet deep.
Here’s how that’s done:
After the foundation is perfect, with all the blemishes filled with lead and sanded smooth, the painter applies a primer, which he also sands until it’s perfectly smooth.
Then comes the first color coat. After that’s dry, the painter will sand it until it’s almost entirely gone; just a few molecules of color remain.
Then he applies the second color coat, lets it dry, and sands it until just a blush of color remains.
He’ll do this 20 or more times, building up the color just a few molecules at a time, over a period of many days, until it’s as clear and as deep as an alpine lake.
")