Making Bad Cows Good Down the Fence Part 1

Making Bad Cows Good Down the Fence Part 1

In a reined Cowhorse contest or a cutting, the cattle are the most important single factor.

In the cutting at least you get to choose, so you only have yourself to blame if you pick poorly.

In the reined Cowhorse contest, you don’t know what you’ve got until it walks through the gate. It might be a Ferrari in overdrive or a gutless four cylinder.

It pays to do your homework watching the herd work portion of an aged event, as you might recognize your beast as it makes its entrance for the boxing or fence, but that’s not always a realistic strategy.

If you’re at a weekend show, the best you can do is watch the classes ahead of yours for characteristics that run through the herd. Watching the open class might make you queasy thinking of all the not-so-good things that could happen to you, but you’ll learn a lot about the cattle that day.

Knowledge is power and armed with it will help you make better decisions. Usually, the cattle have come from the same ranch, are the same breed and have had the same handling and feed, but every cow is an individual.

You’ll get the whole spectrum of personalities over the course of the day, but things like hot weather, drawing late in the afternoon, the ground, or being first or last in your set can have a big influence on the cattle.

How you handle the cow you draw can make a bad one good or a good one bad.

All the studying and preparation that you’ve done may go right out the window when they let your cow in as there’s always a few renegades, but your percentages of that happening are low.

If you do get a wild one, plan on being more defensive immediately. Approach it slowly with caution and when you make any turns don’t allow your horse to move towards it. Give it an opportunity to settle before you get into its bubble.

If it just runs fence to fence, it probably won’t get much better, so get started down the fence as soon as you’ve taken enough of the edge off.

If you draw a slower cow, prepare to be more aggressive stepping right up to it and make some noise if you have to.

Whatever you do, don’t bore the judge on one like that.

I’d enjoy hearing your thoughts before I write the next 2 installments on this topic!

LET US KNOW YOUR THOUGHTS 

How to Hold and Adjust Romal Reins

How to Hold and Adjust Romal Reins

Riders who are not accustomed to using a romal are sometimes not aware of the penalties awaiting them if they don’t hold it properly.


  • The romal should go across the palm and around the thumb or with the thumb on top

  • The hand should be closed into a fist over both reins with no fingers in between, and the thumb must be on top.

  • The rein hand should always be in front of the romal’s knot, where the two reins meet.

  • The free hand must always be to the side (whether left or right), 16 inches from the rein hand or you’re considered to have 2 hands on the reins

  • The reins can be adjusted with the free hand at any time, except in the NRHA reining where the rider may only do so while the horse is completely stopped during the pattern. To adjust while “on the move” in the NRCHA, you pull the reins with your right hand to shorten what’s being held in the left hand

  • In all western classes, romal or the end of the romal – also known as the “popper” – may be straightened or disentangled anytime during the class, provided the rider’s free hand used to straighten or disentangle remains behind the rein hand.

  • Riding in romal reins is different, but with a little practice, I think you’ll enjoy the feel.

LET US KNOW YOUR THOUGHTS 

Two exercises to help spin

Two exercises to help spin

Here are 2 of my favorite ways to tune up a spin other than the fence drill that I’ve posted before.

The first is to build cadence and increase speed.

Start with a bridled up trot in a small circle. Drive your horses hindquarters up underneath them as far as you can. When you have a good cadence on a small circle, softly close your outside rein on his neck and press him with your outside leg. Try to keep the same rhythm, speed and cadence.

I have a metronome in my head going “step-step-step” while I trot and then try to keep that same beat while I spin.

Then come right back up onto the same circle briskly trotting with no loss of cadence.

Then you’re ready go into the spin again for a few beats, then come up trotting. Do this several times then give your horse a rest.

It’s pretty hard work for them, so build into it gradually. Sorry the videos are so short, but I can’t seem to be able to send them from my phone if they’re any longer. I’m open to some techy suggestions though!


The second exercise helps get a horse’s head lower and positions him with a very rounded back and little resistance in the face, he can step around more easily and with more speed and accuracy, 

Bridle him up and drive his hindquarters up underneath him. Spread your hands wide and low evenly on either side of his neck staying forward in your saddle. Hold your reins pretty tight, trapping him, and keeping him relatively straight with just a little bit of nose tipped to the inside of the spin, start bumping him with your outside leg.

That’s really the only cue you’ll use to start the spin. Keep increasing the intensity of your leg bumping until he starts to turn.

Let him catch a rhythm for a few steps, then step right back out on the circle and walk or jog for a bit in the small circle, then try again.  

This exercise usually takes a couple of days to see improvement as your forcing him to turn with his body in a much more collected frame.

It will shorten his wheelbase and get his head dropped down along with less resistance in his face, should make for a cleaner, steppier spin.

LET US KNOW YOUR THOUGHTS 

Are You Excited or Scared?

Are You Excited or Scared?

Sometimes the feelings of being scared and excited can elicit the same physical response in our bodies.

When new challenges and opportunities show up in our riding lives, we may think we are feeling scared when what we really feel is excited. We might not have been taught how to welcome the thrill of a new opportunity, so we back off, feeling anxiety instead of awakening our courage to take on a new challenge.

The butterflies in our stomach or a rapidly beating heart are not necessarily a sign that we are afraid. Those very same feelings can be translated into excitement, curiosity, and passion.

There is nothing wrong with being afraid as long as we do not let it stop us from doing the things that excite us.

Most of us assume that brave people are fearless, but the truth is that they are simply more comfortable with fear because they face it on a regular basis. The more we do this, the more we feel excitement in the face of challenges rather than anxiety. The more we cultivate our ability to move forward instead of backing off, the more we trust ourselves to be able to handle the new opportunity, whether it’s going to a show, riding a colt for the first time or going down the fence.

When we feel our fear, we can remind ourselves that maybe we are actually excited. We can assure ourselves that this opportunity has come our way because we are meant to take it.

Framing things just a little differently can shift our mental state from one of resistance to one of openness. We can practice this new way of seeing things by saying aloud: I am really excited showing this horse for the first time! I am excited to go down the fence! Or, I am excited to have the opportunity to do something I have never done before.

As we do this, we will feel our energy shift from fear, which paralyzes, to excitement, which helps us direct that energy into growing and learning. Soon you’ll find yourself saying, “I can’t wait to go in the show pen and show my horse!”

Try it!

LET US KNOW YOUR THOUGHTS 

The “Whoa Back”

The “Whoa Back”

In this exercise, you stop your horse, ask him to further soften to your hands, then back him up several times in succession in response to “whoa.” In this way, the idea that “whoa” means no forward motion is reinforced, plus he learns to get off the bit the moment you slowly take the slack out of the reins, and to be backing before the reins come tight, without raising his head or locking his jaw. 

Below my horse is showing a lot of resistance at first, then he starts to soften and engage his whole body. It should feel effortless.

You’re teaching all this through the repeated backing-up instead of repeated stopping. As a result, this is a terrific exercise for improving your horse’s stop without putting a lot of extra wear and tear on his hocks. It’s also something you can go back to when you begin to add speed if your horse starts to brace, as the Whoa-Back is a great way to soften him up. 

Here’s how: Start this exercise at an easy lope. Before you ask for the stop, make sure your horse isn’t just “motoring on”; in other words, he should have “at least one ear on you” (meaning he’s paying you some of his attention). Also, make sure he’s traveling straight and “in the box”—not leaning to one side or the other, or pushing on the reins.     

Then, sit down, and say “Whoa.” When your horse stops, back him off your hands a little more assertively than you have up to this point. To do this, hold your hands softly but firmly at belt level with enough pressure on them to keep him from going forward as you bump with both your legs to get him to come off the bit (i.e., you want him to rock back, pick his shoulders up, keep his head down, and stay soft in your hands). If he resists coming off the bit, up the ante by bumping more insistently with both legs in neutral position until he does, but not pulling harder. 

Once he softens, back him up briskly and steadily until he feels as if he’s “getting back” (moving his feet more quickly) instead of just backing up. When he does, release all pressure and let him stand quietly for a moment. Then, without going forward, say “Whoa” again, take the slack out of the reins, and make him “get back” again. At this point, it’s important not to pull more or harder to get him to resume backing up; use your legs as necessary to drive him into the “wall” made by your hands, which then cause him to go back.

When he’s backing up as if he’s going somewhere (other than to a funeral, that is), let him stop and rest again. Keep going like this—backing, then resting—all the way across the arena if need be to get him responding willingly and lightly. Then pick up the lope and start again from the beginning. 

Once he’s responding willingly at an easy lope, begin to speed him up. Be sure as you do, however, that you also increase his collection by using your legs in neutral position to push him into the bridle. He needs to drive from behind, rather than just “colt lope” on his front end. If he pulls the reins right out of your hands when you ask him to stop, he’s falling onto his front end—the result of not enough collection.

He’ll start to read your body better and softly be backing before all the slack comes out of your reins. It will feel effortless and resistant free. That’s a good time to go take a trail ride and try it out under different circumstances.

Let me know how it works for you!

LET US KNOW YOUR THOUGHTS 

The “Whoa Back”

Fencing Troubleshooting

The most common mistakes people make with this exercise are failing to continue driving the horse all the way up to the fence, and pulling on the reins instead of letting the fence do the work.

Troubleshooting

Common problems in “fencing,” and how to fix them. 

If the horse:

Wiggles on the approach.

If your horse breaks gait, falls out of lead, or won’t stay perpendicular to the fence as he nears it, just continue up to the fence as best you can, then stop and rest.

Over time, as your horse comes to understand what’s being asked of him, this problem will resolve itself. 

Raises his head.

If his neck comes up in anticipation of reaching the fence, just continue to drive with your legs in neutral position and bump gently on the reins, as you normally would, to bring his head back down.

Races.

If he starts speeding up on his own instead of responding to your cues for speed, just take the slack out of the reins and ask him to soften through the jaw, then draw him down to a trot, then a walk, then a stop, then a back-up, all in about six or so strides.

Sit there for a while and let him relax. Whatever you do, don’t jerk on the reins—this only frightens him and compounds the problem. Jerking will just make him raise his head and brace through the neck more.

Another way to deal with it is to change your plan and simply slow down and turn at the fence and keep going. Often, it’s the stop that worries a horse, so by taking the stop away for a bit, he can relax. (In the meantime, you can work on Runarounds, which I’ve already written about.)

After he’s relaxed, have another try at the fence and remember that fencing isn’t beneficial for all horses. If you have one that doesn’t seem to improve, there are a lot of other ways to work on your rundowns and stops.

Happy fencing!

LET US KNOW YOUR THOUGHTS 

Troubleshooting the Runaround

Troubleshooting the Runaround

Common problems in the run-around, and how to fix them.

If the horse: 

Races:

If he starts speeding up on his own instead of responding to your cues for speed, break him down to a stop then back up. Then just sit for a minute. If that’s not helpful, make him collect up and slow to the last speed he was comfortable at, and continue doing the run around exercise.

Gradually, he will get more comfortable with speed and not make such a big deal about it (especially if you don’t!).

Leans:

If he starts to lean during the build-speed part of the exercise (as toward the barn or gate), draw him back and change course about 30 degrees to overcorrect the lean, then continue on that line (see diagram). If he leans again, make another 30-degree correction, and so on.

If you wind up going in the opposite direction altogether, that’s okay—it’s the sort of “healthy confusion” that keeps your horse guessing and therefore paying attention to you. As you can, pick up the track of your Runaround again, and keep going.


Dropping a shoulder/falling out of lead:

This commonly happens when you ask for the slowdown if your horse doesn’t engage both hocks equally. To correct it, don’t make a big fuss, but in the space of about six strides, softly draw him to you and break him to a trot, then a walk, then whoa, then back him up for a bit and ask him to soften his jaw to the reins.

Resume the exercise, but this time, before asking him to slow down, make sure you’ve softened him in the face (gentle bumping on the reins if need be) before applying your off-lead leg (i.e., if he’s on the left lead, use your right leg) just behind neutral position to drive him up so he can’t fall out of the lead. Then, more gradually than you did when he fell out of lead, ask him to slow down.

He’ll get the hang of it. It’s uncomfortable for the to fall out of lead, but it’s hard work to collect, so sometimes they opt for the easy way.

Don’t make a big deal about it.

Remember, don’t major in the minor things!

LET US KNOW YOUR THOUGHTS 

The Runaround

The Runaround

The quality of a horse’s stop is directly related to the quality of his rundown. This exercise, in which you build to rundown speed, slow and collect instead of stopping, then go around the end of your arena and build to rundown speed again, is perfect for working on your rundown without the wear and tear of too many stops.

It also helps “take the brace out” of your horse’s stop as he learns to “downshift” his weight back on to his hocks to slow down, just as he must when he actually stops. If his first response to being slowed is to drop onto his front end, that’s what he’ll do when he stops, and that’s exactly what you don’t want. By not stopping, but instead just downshifting, you can reprogram that response.

The Runaround also helps you develop greater speed in your rundown. Many horses have a low “do not exceed speed” (if you do exceed it he’ll start to think he’s a wild horse!) By pushing your horse up to that speed, backing off and asking him to collect up and soften, then nudging him up to it again, you can desensitize him to going fast. He learns to “stay with you” and continue to respond as you “pour the coal on.” Every horse can develop a higher do-not-exceed speed, but some will remain more balanced and in control than others. This exercise helps your horse achieve his best, most controlled rundown speed.

Finally, if you practice the Runaround properly, your horse will naturally begin to slide in his stops. How far he slides will ultimately be determined by his genetics, your feel and timing, the quality of the ground, the nature of his hind sliding plates, and how he feels (i.e., whether or not he’s sore). But working on the Runaround will improve the quality of his rundowns, which will naturally improve the quality of his stop. In other words, work more on your run, and the stop and slide will take care of itself.

Ride the “build speed” part of the Runaround down the long side of your arena (see diagram). Stay in the middle third of the arena, at least 20 feet in from the fence line so you have room to make corrections (to be covered in my next article). Ride the slow-collected part around the ends of your arena. As you encourage your horse to build speed, be sure to look up and straight ahead, and keep equal pressure on his sides; this will help him stay straight between your legs and reins. Ride with purpose, so that he keeps one ear on you, indicating he’s paying attention. Make sure he’s increasing his speed only when you ask him to—not of his own volition.

If he’s responding well, ride as if you’re going to run all the way to the next ZIP code. Then, as the end of the arena approaches, sit down in the saddle and gather your horse up—think of downshifting an expensive car. Pick up your reins as necessary, but keep your legs slightly closed around him to keep him driving from behind. From all the work you’ve done to this point, when you pick up the reins he should soften in the jaw and say, “What would you like me to do?”

Keep him soft and collected as you slow down on the straight line at the end of the long side and as you go around the short end, then build speed again down the other long side. Continue on like this until he’s doing it well, stop and rest for a bit, then go on. Over time and multiple practice sessions, you’ll find he’ll be able to reach higher speeds without getting “wobbly in the wheels” or falling out of lead.

LET US KNOW YOUR THOUGHTS 

Fencing

Fencing

We used to think “fencing” (using the fence as a barrier to help get a horse sliding in his stop) made a horse bracy in the front end. But I think we just weren’t doing it correctly.

Done properly, fencing can help teach your horse to run straight and true. This is especially important in a short arena, where your run must be as reasonably long as it can be. If your horse begins to anticipate the upcoming fence and starts to shut down, you’ll never get a good stop. “Fencing” teaches him to keep going toward the fence until you give the stop signal.

A second reason you “fence” is to encourage the horse to drive up underneath himself (push from behind) while giving in the face, raising his shoulders, and rounding his back (in other words, increase his collection—think of that accordion) without pulling on his face while sliding. You let the fence do the hard work, and you’re not the “bad guy.”


A third reason for this exercise is to help a horse who’s just beginning to slide. Once he’s loping straight in his approach to the fence, building speed as his rider dictates (never choosing his own speed), and maintaining that speed as he nears the fence, he’ll begin to understand how to keep “running” in front as he starts to slide in the back, to keep from colliding with the fence.

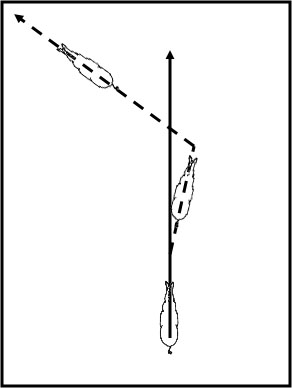
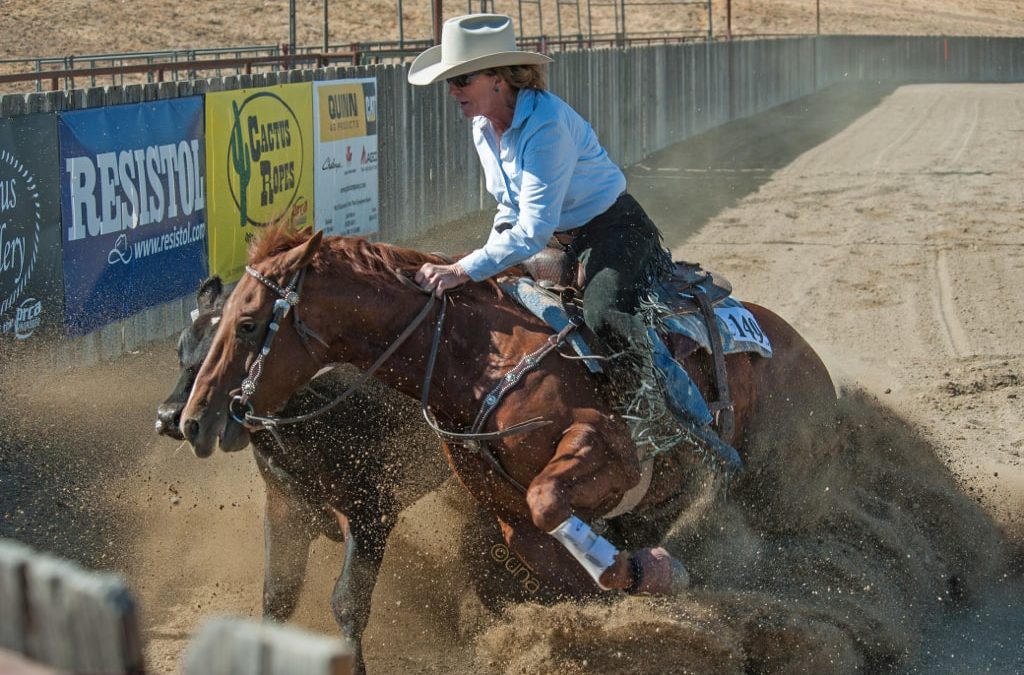
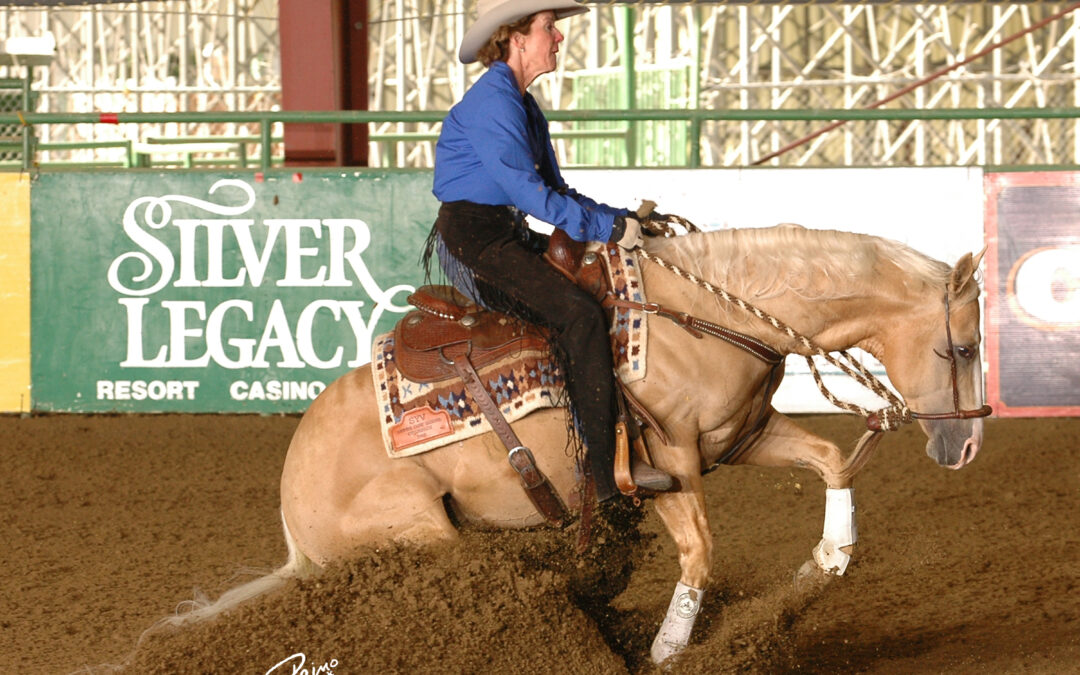
I’ll explain how to fence your horse at a lope; you can also perform it at a trot for the first few times.

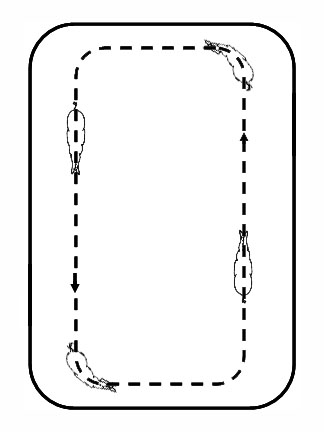
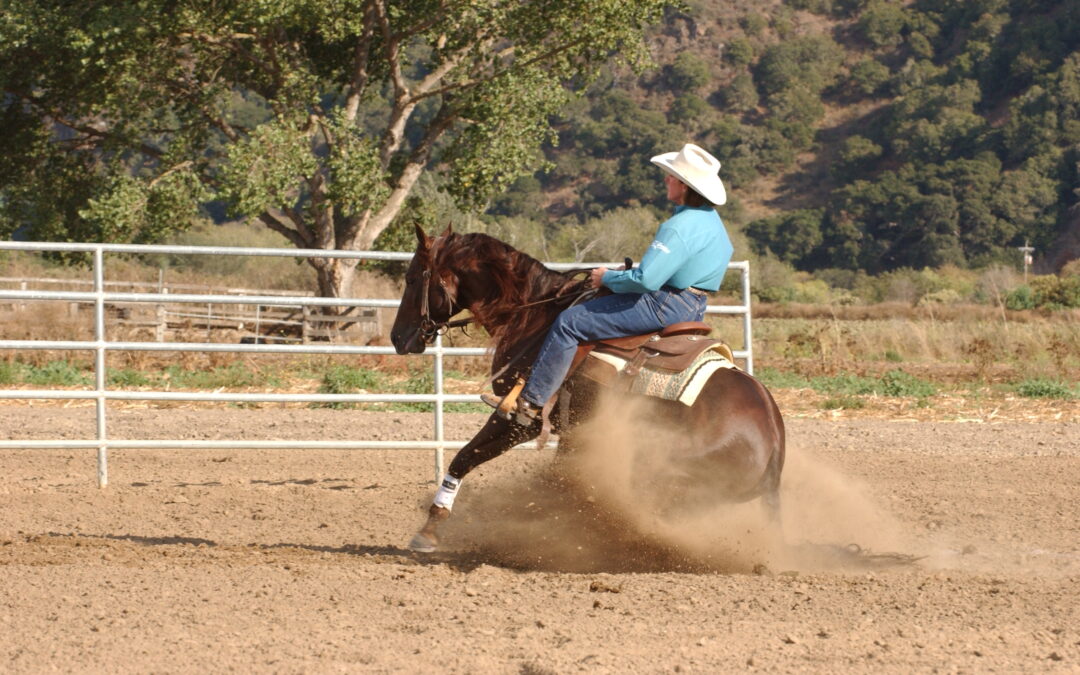
Begin by loping your horse around for a bit until he’s no longer fresh and is beginning to think about wanting to slow down and stop. Then lope a straight line slowly through the middle of the arena toward the end fence (be sure it’s a safe one). Use your legs and reins to keep him straight and perpendicular to the fence. Continue to drive with your legs right up to the fence. When you reach it, don’t pull on the reins; let the fence stop your horse. Then stand and rest for a moment, giving your horse a pat. You want the fence to become “a good place to be” in your horse’s mind. Then repeat the entire sequence.

As your horse becomes comfortable loping straight up to the fence and stopping, you can begin to say “Whoa” just before the stop.

Over time, as your horse’s confidence in this exercise grows, begin to build speed on the approach to the fence. If your horse starts to get nervous, go back to the last speed at which he was completely comfortable, then build even more slowly from there. And, whenever you’re stopped at the fence, spend as much time as needed until your horse is calm and relaxed.

LET US KNOW YOUR THOUGHTS 

Essential 7: Pivot Troubleshooting

Essential 7: Pivot Troubleshooting

Troubleshooting. Common problems in the pivot, and how to fix them: 

• Too much bend. This is caused by trying to pull your horse around with the direct (inside) rein, so overbending his neck.

We resort to this when we can’t make his shoulders move. This will actually cause you to end up going in a circle instead of a spin.

To correct it, think “kick” more than “pull.”

Use your legs assertively to keep your horse’s body aligned and to keep him moving around; use that inside rein just enough to keep his nose tipped in the direction of movement and engage your indirect (outside) rein towards your belly (but not across your horse’s neck). 

• Counter-bend. This happens if you use too much indirect (outside) rein, trying ineffectually to make the shoulders move, and in the process pulling your horse’s head to the outside creating a counter-bend in his neck.

Correct this by using a little more inside (direct) rein and a little less outside (indirect) rein, plus bump with your outside leg at the cinch more assertively.

See photo.

If your horses shoulders won’t move- go back and work on your side pass until you can move them in any direction especially away from the gate (or magnets).

LET US KNOW YOUR THOUGHTS