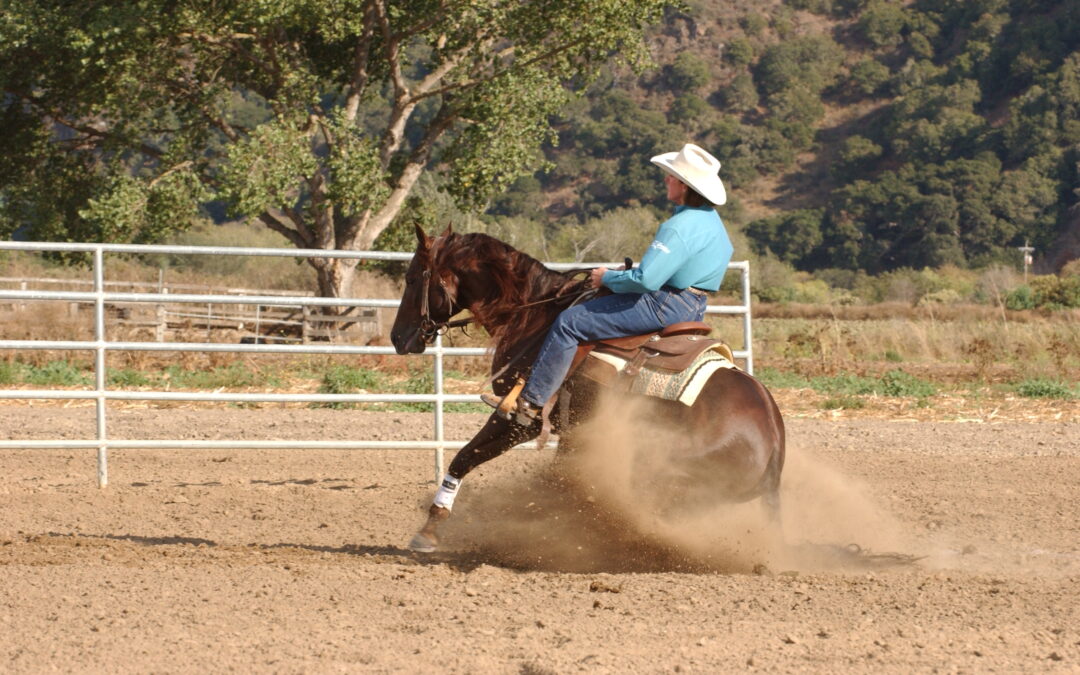
How Horses See

How Horses See

I thought it would be an interesting detour to explore how horses see, and how that relates to our understanding them when it comes to training.

Horses evolved in open grasslands. They’re designed to be awake and grazing day and night. They have excellent low light vision, unlike humans who need to see well in the daytime.

Did you ever wonder why your horse’s pupil looks bluish-grey? That’s the tapetum lucidum which reflects light back through the photoreceptor layer of the eye so that the horse has high sensitivity to light.

Remember, horses graze at night and need to see predators and be able to move quickly over uneven ground to escape.

We humans don’t have that so our night vision is poor, but our eyes adjust more quickly from bright to dark. Horses adjust more slowly, but when they do, they see better than we do.

This is what we see walking into a barn during the day.

This is what your horse sees walking into that same barn.

In twenty minutes, this is what your horse sees – it’s brighter and in more detail than you can ever perceive. Which is why you won’t notice a sudden movement at the far end of the barn, but your horse will.

Which brings us to loading in a trailer. This is what we see.

This is the “black hole” that they see.

By opening up the 2 windows, it becomes much less forbidding.

Many thanks to Terri Golson and her article “In Light and Dark”. I’ll share some more in my next article!

LET US KNOW YOUR THOUGHTS 

Essential 7: Pivot Troubleshooting

Essential 7: Pivot Troubleshooting

Troubleshooting. Common problems in the pivot, and how to fix them: 

• Too much bend. This is caused by trying to pull your horse around with the direct (inside) rein, so overbending his neck.

We resort to this when we can’t make his shoulders move. This will actually cause you to end up going in a circle instead of a spin.

To correct it, think “kick” more than “pull.”

Use your legs assertively to keep your horse’s body aligned and to keep him moving around; use that inside rein just enough to keep his nose tipped in the direction of movement and engage your indirect (outside) rein towards your belly (but not across your horse’s neck). 

• Counter-bend. This happens if you use too much indirect (outside) rein, trying ineffectually to make the shoulders move, and in the process pulling your horse’s head to the outside creating a counter-bend in his neck.

Correct this by using a little more inside (direct) rein and a little less outside (indirect) rein, plus bump with your outside leg at the cinch more assertively.

See photo.

If your horses shoulders won’t move- go back and work on your side pass until you can move them in any direction especially away from the gate (or magnets).

LET US KNOW YOUR THOUGHTS 

The Loop

The Loop

Many times when turning a cow on the fence, it manages to come off the fence. There are a few reasons why this happens.

One would be the cow jumping over the horses rear end (see the picture).

There’s no way, that this wouldn’t require a loop. There’s no penalty for this either, as working advantage was never lost.

It is a penalty (1pt), if loss of working advantage was the cause of having to loop in the first place.

What that means is there was a big space/gap between the horse and the cow. Either the turn wasn’t tight, or the horse was slow exiting, or the horse got too deep into the turn and caused it to jump out.

Whatever happened, the horse lost working advantage and so had to loop the cow.

Working advantage can also be lost during the execution of the loop. That means that somewhere in the loop, the horse got far enough away from the cow, to lose working advantage.

I’ve heard it said, that if you couldn’t rope the cow at any time during the loop, you’ve lost working advantage.

So, let’s go back to the picture.

The cow jumps over my horse’s butt.

I would have to wheel around to the right (towards the cow, otherwise I’d be turning tail and get zeroed).

Then, I’d have to shape the cow around to the right, by staying off to it’s left just a bit, or I’d risk jumping it into the fence, or turning it left and switching sides of the arena.

As soon as the cow was approaching the end wall and was committed to going right, I’d switch over and be just off the cows right hip. This would enable me to drive it along the fence until I was ready to turn it again.

If I was on the fence and turned the cow and it came off the fence at a 30* angle, I probably would not loop it, but would try to shape it back to the fence for my next turn. If it was more than 30*-40* would have to decide whether to loop or not to loop.

There’s a higher degree of difficulty and a bigger risk taken if you don’t loop it. It definitely requires more skill for the horse and rider to shape it back to the fence without looping or to execute a good open field turn.

In that split second, the rider has to choose. If you have a horse who can really do an excellent open field turn, go for it! If the angle is wider than 45*, you’d probably want to loop it around.

It’s good showmanship to get the cow shaped however works best, so your horse can get the best turn possible.

Practice all the different scenarios at home, so when you’re showing, choosing the best option becomes second nature.

LET US KNOW YOUR THOUGHTS 

Essential 7 Pivoting on the Hind End

Essential 7 Pivoting on the Hind End

The 360-degree pivot on the hind end is the start of what will eventually be your spin, so a correct foundation is extremely important.

All major problems in the maneuver, now and later, result from lack of shoulder control.

With Essential 3 (the counter-arc circle) and Essential 6 (moving off the leg), you’ve started to gain control of your horse’s shoulder.

With this, the final Essential 7, you’ll build on that control.

A common mistake at this point is to “go faster wronger.” In other words, eagerness to move a pivot into a spin, prompts riders to sacrifice form for speed.

Don’t do it! Go as slowly as you need in order to maintain control and do it correctly.

In the beginning, think in terms of a 90-degree turn, and then a 180. Build toward the 360 in increments.

There are many different ways of teaching a horse to step his front end around; one tried-and-true method is to walk in your perfect circle, then tighten it down while taking care to keep your horse’s nose pointed in the direction of the turn.

This is the method I’ll teach you.

The goal. Your horse will make his circle smaller and tighter, while keeping his jaw soft and his neck level, with his nose tipped slightly in the direction of movement.

As the circle tightens to a pivot, his outside front leg will cross over the inside one. His hind legs will remain more or less in one place (you needn’t worry about either of them being “planted”).

You will want to move only as fast as your horse can maintain proper form.

Here’s how. Begin by reviewing Essential 2, Walking a Perfect Circle.

Do it in a corner of your arena, so you can use the wall as a visual marker and a physical barrier.

As your horse moves forward with energy, use pressure on the inside rein (to keep his nose tipped to the inside) and with your inside leg in neutral position (to keep the circle round), supporting with your outside rein against your horse’s neck as need be to keep the circle symmetric.

Then gradually begin to reduce the size of the circle.

When you’re ready to step around, remove the pressure of your inside leg and add a little backward pressure to the outside rein by pulling your hand gently towards your belly button (but not across your horse’s neck). Also bump with your outside leg just behind the cinch.

Remember, your inside rein is to indicate the direction of movement and to keep your horse’s nose tipped that way—not to pull your horse around. If you mainly pull that inside rein, you’ll pull your horse out of alignment. And that backward pressure on the outside rein is to suggest stepping across, and shouldn’t be used so much that it pulls your horse’s head to the outside, away from the spin or pulls him back to where he’s stepping behind or on his inside front foot. You’ll probably use your outside leg more than any other aide.

If you keep him aligned with both reins and both legs, you’ll be setting the stage for greater speed later.

In the beginning, don’t worry about speed at all — go as slowly as you must in order to keep your horse’s body properly aligned, his jaw soft and poll flexed, and his nose correctly tipped.

Be satisfied with just a step or two of the front legs crossing over before moving him back onto a slightly larger circle, re-checking proper form.

Then try again. Any time he begins to lose that proper form, move immediately onto the larger circle, reestablish his form, then try again.

Gradually, over time, ask your horse to add steps one at a time.

If you remain patient and keep showing him how to do it (as opposed to trying to force him), you’ll be surprised how quickly he’ll be willing to step all the way around.

Use a visual marker (a fence, bushes or other nearby landmarks if you’re practicing out on the trail) to keep track of how far around you’re going.

Be sure to work equally in both directions, concentrating on getting willing steps in each direction. Your horse will be stepping right around in no time!

LET US KNOW YOUR THOUGHTS 

Leg Yield, Half Pass, and Side Pass

Leg Yield, Half Pass, and Side Pass

Do you know the difference?

The term “leg yield”, half pass”, and “side pass” seem to be used interchangeably but are all very different and are indicative of your horse’s level of training and responsiveness. Do you know the difference?

Here you go:

Leg yield – The leg-yield is a lateral movement in which a horse travels both forward and sideways at the same time.

It is commonly used by riders to open and close a gate. The horse is fairly straight through his body in the leg-yield, although he may have a slight bend opposite to the direction of travel.

This is a more basic movement.

Half Pass – The half-pass is also a lateral movement seen mostly in dressage in which the horse moves forward and sideways at the same time.

Unlike the easier leg-yield, the horse is bent in the direction of travel, slightly around the rider’s inside leg.

Side Pass – When doing a side pass your horse moves directly sideways in response to your rein and leg aids.

Teaching your horse to do a side pass, also called a full pass, will make him more obedient, safer, and more fun, because he is must be very broke to do it. A true “side pass“, means your horse moves laterally without any forward movement.

To side pass correctly, the horse must move both forehand and hindquarters directly sideways and cross over in front of the opposite foot and his head is aimed in the direction of travel.

Here is a link to a Western Dressage page that has a cool moving diagram, as well as the aides, used to accomplish these:

http://westerndressageuniversity.org/index.php/component/content/article/25-image1/102-side-pass

LET US KNOW YOUR THOUGHTS