Essential 7 Pivoting on the Hind End

Essential 7 Pivoting on the Hind End

The 360-degree pivot on the hind end is the start of what will eventually be your spin, so a correct foundation is extremely important.

All major problems in the maneuver, now and later, result from lack of shoulder control.

With Essential 3 (the counter-arc circle) and Essential 6 (moving off the leg), you’ve started to gain control of your horse’s shoulder.

With this, the final Essential 7, you’ll build on that control.

A common mistake at this point is to “go faster wronger.” In other words, eagerness to move a pivot into a spin, prompts riders to sacrifice form for speed.

Don’t do it! Go as slowly as you need in order to maintain control and do it correctly.

In the beginning, think in terms of a 90-degree turn, and then a 180. Build toward the 360 in increments.

There are many different ways of teaching a horse to step his front end around; one tried-and-true method is to walk in your perfect circle, then tighten it down while taking care to keep your horse’s nose pointed in the direction of the turn.

This is the method I’ll teach you.

The goal. Your horse will make his circle smaller and tighter, while keeping his jaw soft and his neck level, with his nose tipped slightly in the direction of movement.

As the circle tightens to a pivot, his outside front leg will cross over the inside one. His hind legs will remain more or less in one place (you needn’t worry about either of them being “planted”).

You will want to move only as fast as your horse can maintain proper form.

Here’s how. Begin by reviewing Essential 2, Walking a Perfect Circle.

Do it in a corner of your arena, so you can use the wall as a visual marker and a physical barrier.

As your horse moves forward with energy, use pressure on the inside rein (to keep his nose tipped to the inside) and with your inside leg in neutral position (to keep the circle round), supporting with your outside rein against your horse’s neck as need be to keep the circle symmetric.

Then gradually begin to reduce the size of the circle.

When you’re ready to step around, remove the pressure of your inside leg and add a little backward pressure to the outside rein by pulling your hand gently towards your belly button (but not across your horse’s neck). Also bump with your outside leg just behind the cinch.

Remember, your inside rein is to indicate the direction of movement and to keep your horse’s nose tipped that way—not to pull your horse around. If you mainly pull that inside rein, you’ll pull your horse out of alignment. And that backward pressure on the outside rein is to suggest stepping across, and shouldn’t be used so much that it pulls your horse’s head to the outside, away from the spin or pulls him back to where he’s stepping behind or on his inside front foot. You’ll probably use your outside leg more than any other aide.

If you keep him aligned with both reins and both legs, you’ll be setting the stage for greater speed later.

In the beginning, don’t worry about speed at all — go as slowly as you must in order to keep your horse’s body properly aligned, his jaw soft and poll flexed, and his nose correctly tipped.

Be satisfied with just a step or two of the front legs crossing over before moving him back onto a slightly larger circle, re-checking proper form.

Then try again. Any time he begins to lose that proper form, move immediately onto the larger circle, reestablish his form, then try again.

Gradually, over time, ask your horse to add steps one at a time.

If you remain patient and keep showing him how to do it (as opposed to trying to force him), you’ll be surprised how quickly he’ll be willing to step all the way around.

Use a visual marker (a fence, bushes or other nearby landmarks if you’re practicing out on the trail) to keep track of how far around you’re going.

Be sure to work equally in both directions, concentrating on getting willing steps in each direction. Your horse will be stepping right around in no time!

LET US KNOW YOUR THOUGHTS 

Leg Yield, Half Pass, and Side Pass

Leg Yield, Half Pass, and Side Pass

Do you know the difference?

The term “leg yield”, half pass”, and “side pass” seem to be used interchangeably but are all very different and are indicative of your horse’s level of training and responsiveness. Do you know the difference?

Here you go:

Leg yield – The leg-yield is a lateral movement in which a horse travels both forward and sideways at the same time.

It is commonly used by riders to open and close a gate. The horse is fairly straight through his body in the leg-yield, although he may have a slight bend opposite to the direction of travel.

This is a more basic movement.

Half Pass – The half-pass is also a lateral movement seen mostly in dressage in which the horse moves forward and sideways at the same time.

Unlike the easier leg-yield, the horse is bent in the direction of travel, slightly around the rider’s inside leg.

Side Pass – When doing a side pass your horse moves directly sideways in response to your rein and leg aids.

Teaching your horse to do a side pass, also called a full pass, will make him more obedient, safer, and more fun, because he is must be very broke to do it. A true “side pass“, means your horse moves laterally without any forward movement.

To side pass correctly, the horse must move both forehand and hindquarters directly sideways and cross over in front of the opposite foot and his head is aimed in the direction of travel.

Here is a link to a Western Dressage page that has a cool moving diagram, as well as the aides, used to accomplish these:

http://westerndressageuniversity.org/index.php/component/content/article/25-image1/102-side-pass

LET US KNOW YOUR THOUGHTS 

Essential 6 Moving Off Your Leg Troubleshooting

Essential 6 Moving Off Your Leg Troubleshooting

Common problems in getting your horse to move off your leg, and how to fix them.

• Unevenness which means one end is getting ahead of the other along the fence or diagonally across the arena.

Moderate your cues for the end that moves too fast.

It’s usually the front end getting ahead, so hold the rein on that side closer to your horse’s neck in a more neutral position to slow it down and use your leg more aggressively to catch the rear end up.

In the picture above, the horse is pretty even. If he wasn’t, my left hand would move closer to his neck to slow his front end down while I caught his hind end up with my right leg.

• Raising his head/bracing his neck.

To get him to soften, bump with both legs in neutral position for a moment while holding with both reins, to drive him up into the bridle.

If need be, bump the bit lightly on one side and then the other while you drive with your legs and go straight ahead for several steps to break up his resistance.

Then resume going diagonally.

• Cranking his head off to the side (away from the direction you’re going). See in the picture above.

This is usually us compensating for the fact that our horse isn’t moving off our legs enough, so we crank their heads in an attempt to try to get them moving laterally.

Instead, try to straighten your horses head out and use your off leg more vigorously to make him move off it.

A dressage whip can be very helpful in this instance.

Lateral movement done correctly is an excellent way to get your horse responsive to your cues, more supple through his body and softer in his mouth, so do lots of it! It’s a foundation block for lots of things you’ll want to do later like opening gates, maneuvering around obstacles on the trail, and it’s challenging because it requires being able to control both ends simultaneously. That’s why I consider it essential.

LET US KNOW YOUR THOUGHTS 

The Circling Turn Part 2

The Circling Turn Part 2

By popular demand, I’ve burrowed down into the archives to get you 2 really good runs to clear up any confusion about that darned “circling turn”.
 

The first video shows a very difficult cow. It’s numb and pushy and doesn’t want to be on the fence. Matt open field turns both ends at a very high rate of speed and then switches sides (which is now the correct way to do it if you have executed an open field turn) before circling. That run was marked 76 and 77s. It is very evident where the second turn ended and the circling began and he exhibited perfect control of the cow as well as his horse.

The second video doesn’t have the same high degree of difficulty. The first turn is very good, however the second turn blurs into the first set of circles. Where does the turn stop and the circles begin? If he had switched sides before circling that would have been evident, as well as shown a higher degree of difficulty and exhibited how broke his horse was.

That was not a 2 point penalty then, but it is now.

Check it out and see if it’s more clear now. A picture’s worth a thousand words!

LET US KNOW YOUR THOUGHTS 

Circling Turns in a Fence Run

Circling Turns in a Fence Run

Finally, there’s clarity on the circling turn! The NRCHA 2020 rulebook now has a 2- point penalty for a horse that “fails to change sides after a circling turn, prior to the first circle”

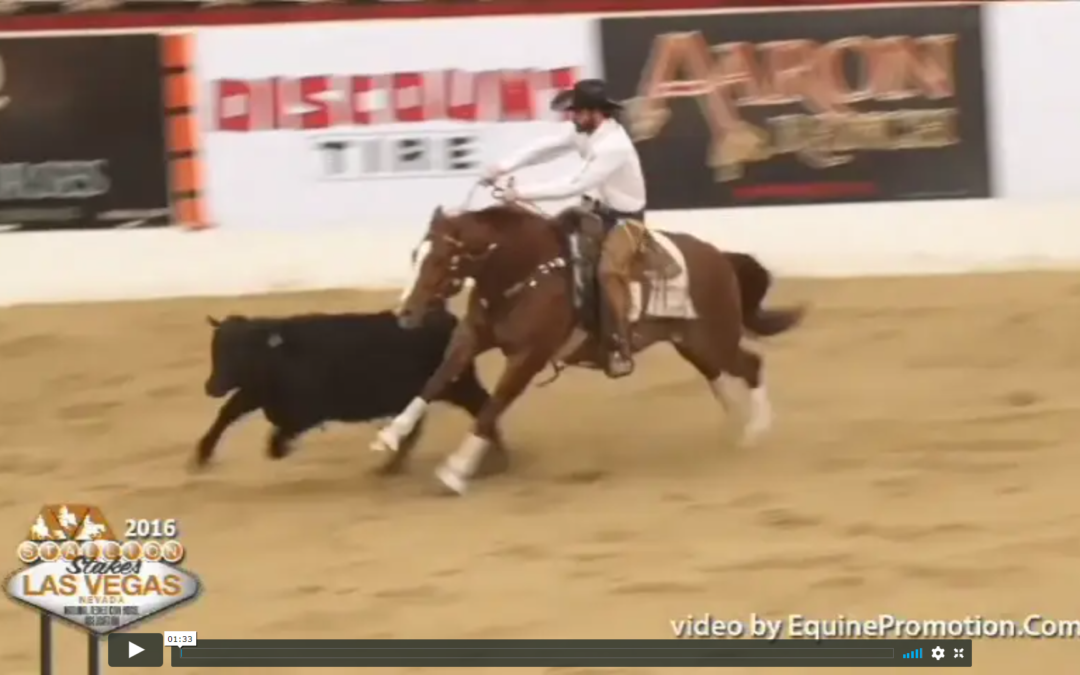
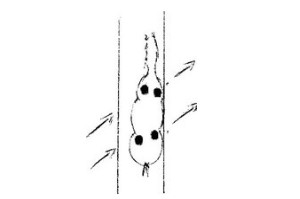
What is a circling turn? When the horse is in the open field (20’ off the wall) and turns the cow, it is called an “open field turn”. It is very hard to execute well, because there’s no fence to help keep your horse on his butt and help keep the cow contained. If your horse gets on it’s hocks and stays close to the cow, it can be a big credit, because it’s very difficult to do, but it can be hard to differentiate between an open field and a circling turn.

An open field turn becomes a “circling turn” when the horse doesn’t use his hocks and continues right into circling it after making an open field turn. It looks more like the horse is actually circling his cow while he’s turning it. It is not a difficult maneuver to do, but it’s hard to judge. Where does the turn stop and the circle begin? They blend into each other like a run on sentence. Both maneuvers have to be judged separately, so it’s important to know when one stops and the other begins.

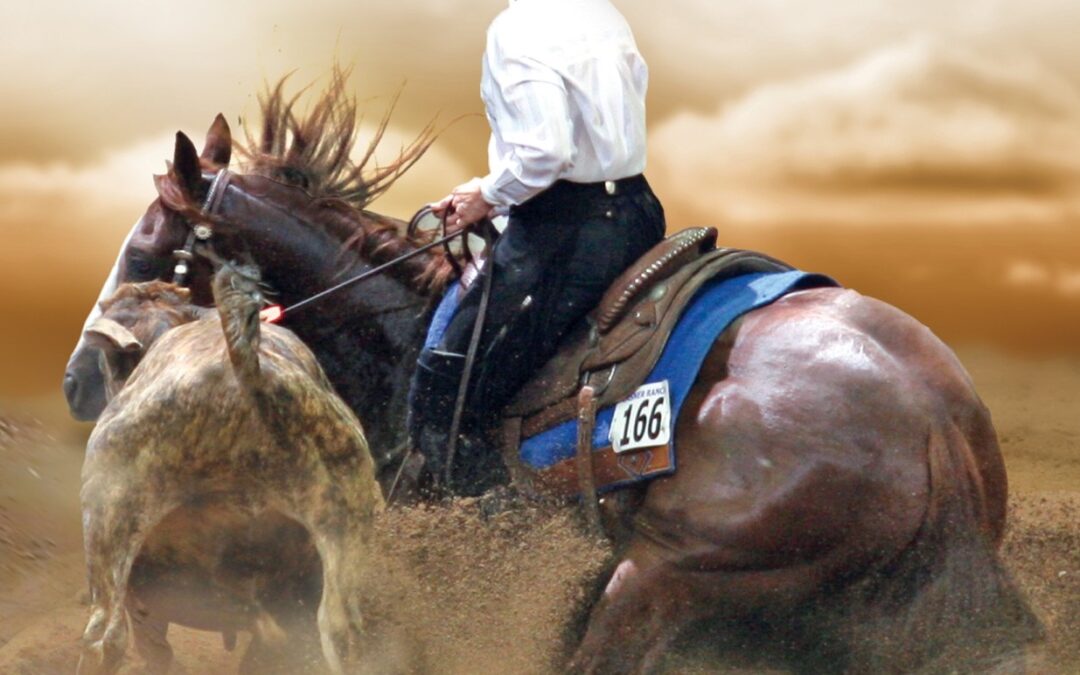
It’s best never to make the judge have to decide something like that. The solution is to switch sides before circling. That’s hard to do and it shows the judge where your turn stopped and the circle began. It also demonstrates a lot of control at that high rate of speed.

You might say that’s a lot of fuss about nothing, but circling turns can get the audience really excited. Those runs are fast and action packed, and many a good judge has gotten tricked into marking a circling turn run higher than it should be. Lots of spreads come on a run with a circling turn (a spread is when there’s a large spread between scores. For instance, one judge marks a 69 and another a 73, on the same run).

The solution to that is making it a 2 point penalty to make a circling turn and not change sides before circling the cow. Now, if all the judges don’t penalize the circling turn, that run will be reviewed. The judge(s) who didn’t call that penalty, have the opportunity to adjust their score.

Now, the score becomes very fair and very accurate. It takes all the guess work out and the judge knows exactly how to record it, and how much to credit or debit the run. It helps the riders and the audience know why a fast, exciting run doesn’t always score as high as they thought it should. It also adds a degree of difficulty that helps separate horses that have a fast, hard run with an open field or circling turn and exhibit exemplary skill in handling switching sides first versus a run with a circling turn that spills into their circles.

LET US KNOW YOUR THOUGHTS