Troubleshooting Walking A Perfect Circle

Troubleshooting Walking A Perfect Circle

In my last reining article, I talked about Essential #2 Walking the Perfect Circle. Here are 3 common problems in walking a circle, and how to fix them:

    • Falling in toward a magnet. You’re on the side of the circle that’s farthest from the barn, and your horse speeds up and cuts in on the circle, because he’s attracted by the barn (magnet). Fix by picking up the shoulder that’s falling in, using the key-in-ignition movement I described earlier in “dealing with the stiff side.”

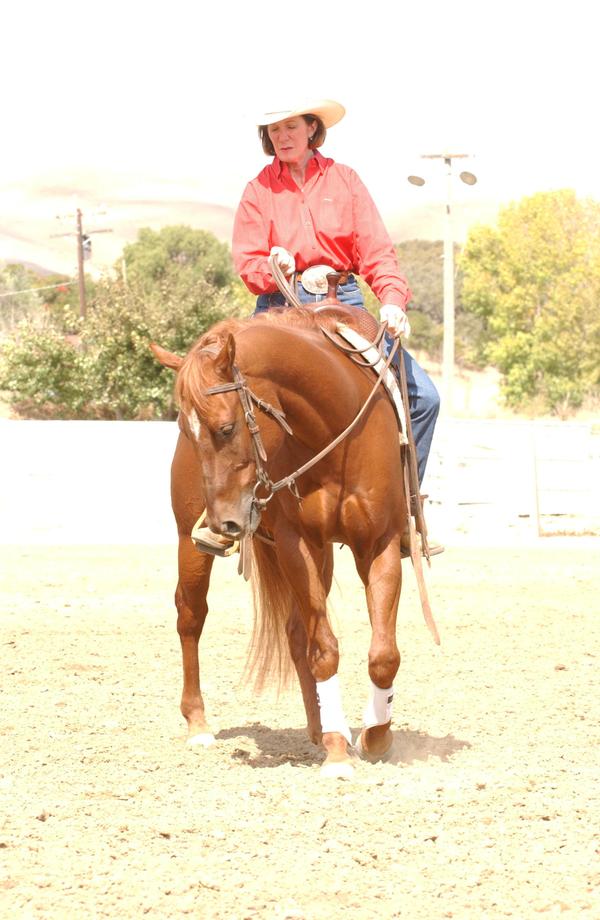
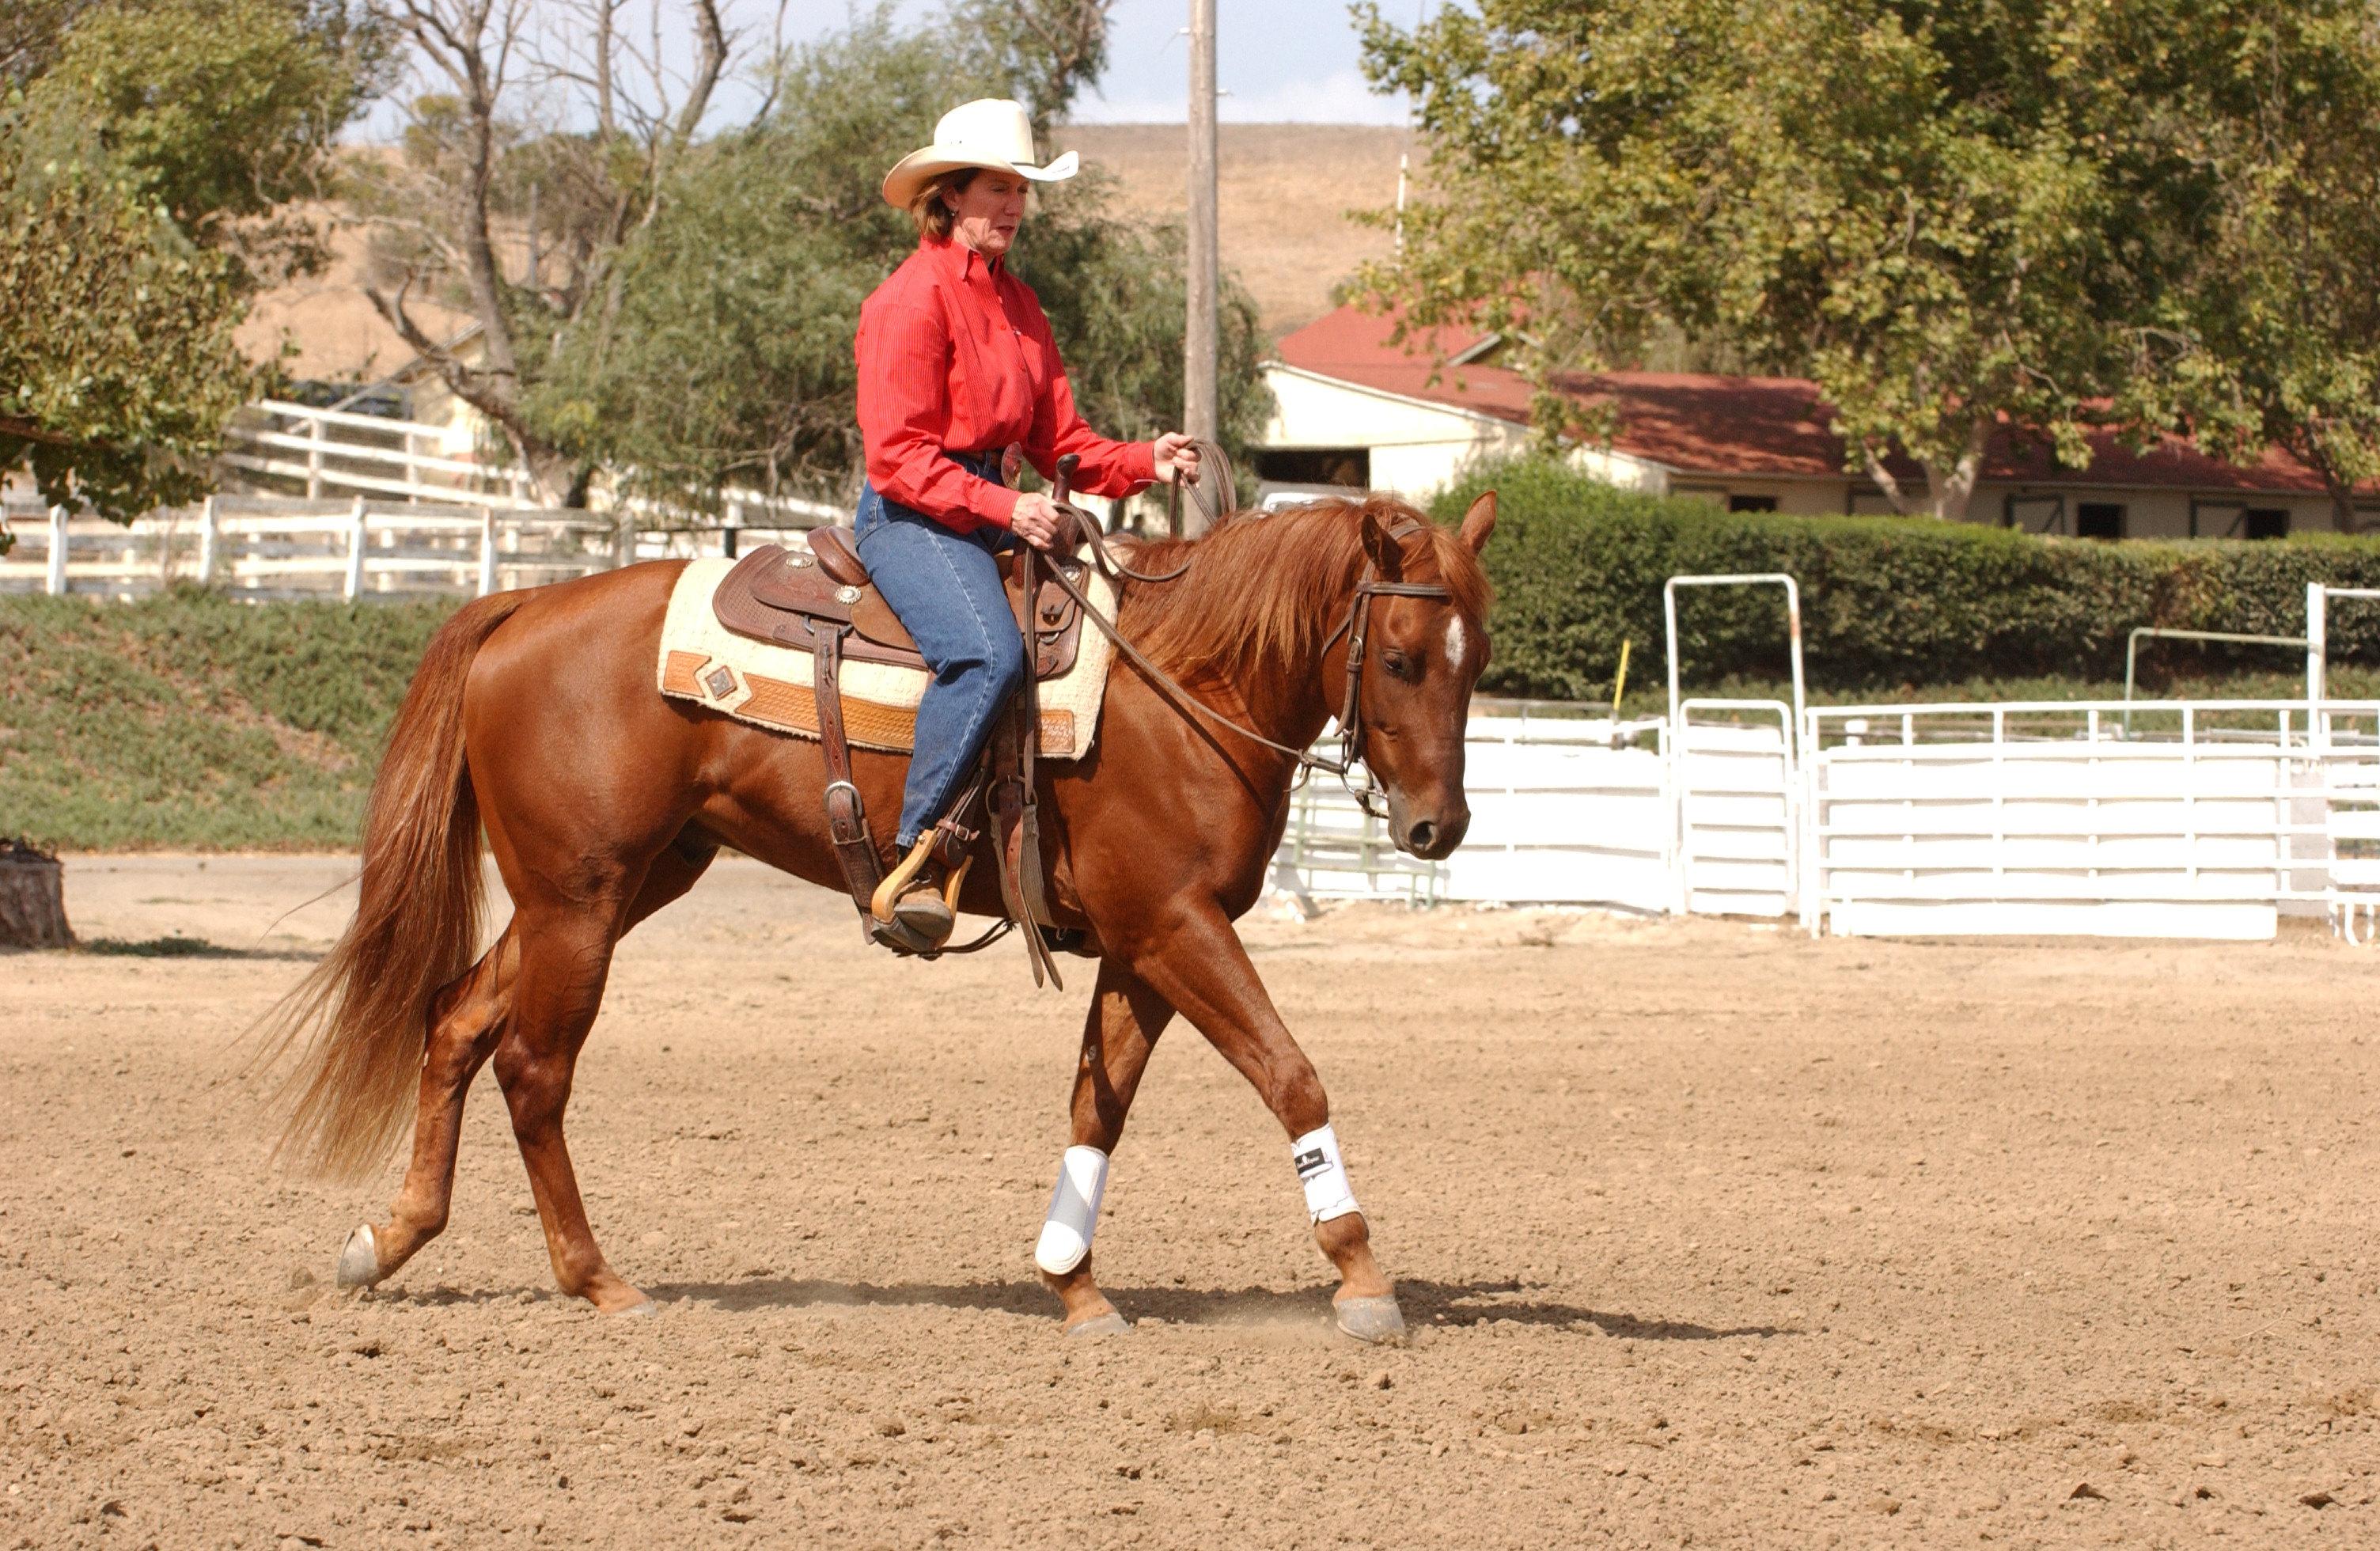
At the same time, pull your outside rein away from the magnet and use your inside leg at the cinch to push his shoulders outward onto the circle. Then over-correct, by making your horse move farther out on the far side of the circle, while still maintaining his body on the same arc of the circle. If possible, get all 4 of his feet to the outside of the circle you’re on. Over-corrections work because they eventually enable the two of you to “meet” in the middle—like a pendulum. (See photo above for hand position)

    • Bowing out toward a magnet. You’re on the side of the circle closest to the barn (magnet) just exactly the opposite side of the above problem. Your horse pulls or drifts toward the barn, bulging the circle out in that direction. Fix by drawing your outside rein back in the direction of your belly button, and against your horse’s neck, to stop the outward drift of his shoulder, and applying your outside leg in neutral position to correct the outward bulge of his barrel. Over-correct by making him cut across the circle. Make a sharp 90* pivot and go straight through the middle of the circle. Rejoin the circle at exactly the opposite side, farthest from the barn.

    • Losing impulsion and focus (“wandering”). Drive vigorously with both legs in neutral position and cluck to keep him “motivated” and moving with energy.

LET US KNOW YOUR THOUGHTS 

Essential #2: Walking a Perfect Circle

Essential #2: Walking a Perfect Circle

In a previous article, I covered Reining Essential 1 (giving his face). When your horse is responding well to that, begin work on Essential #2, walking a perfect circle. This one sounds easy, but it isn’t! Once you achieve it, you’ll understand the basics of maintaining control over your horse’s entire body.

Perfect circles will serve as the foundation for the circles and spins you’ll see in all patterns. 

In perfecting your circles, you’ll also discover and overcome your horse’s magnets—that is, the things (like the barn or the trailer or his buddies) that draw him from the circle you have in mind. 

The Goal 

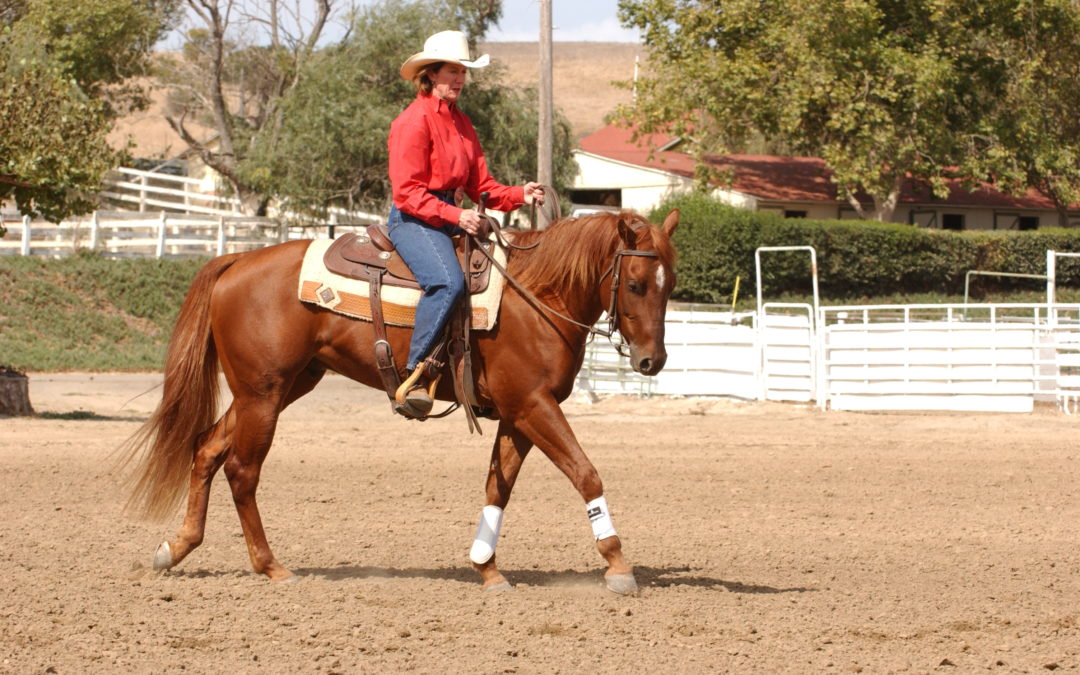
A perfect circle is a symmetric circle, meaning precisely round as opposed to oval, oblong, or egg-shaped. As your horse travels this circle, he should stay soft in your hand and flexed slightly to the inside through his neck and body, with no deviations in speed. His hind feet should follow in the tracks of his front. He should be equally soft and responsive in either direction. 

TIP: Work on freshly groomed ground so you can easily see your horse’s tracks. 

Walk your horse forward, using both your legs in neutral position to move him in an energetic rhythm. Keeping both your legs active, and with your hands 12 to 24 inches apart, apply light, direct-rein pressure on what will become the inside rein to tip his nose to the inside of the circle (so that you can just see the corner of his inside eye) and begin the circle.

Use leg pressure and the outside rein as needed, to keep the circle round. Horses tend to be asymmetrical; going to their “hollow” or right side (clockwise), they tend to bend too much.  Going to their “stiff” or left side (counterclockwise), they tend to resist bending. You’ll need to compensate for this and help them become ambidextrous. 

Dealing With the Hollow Side 

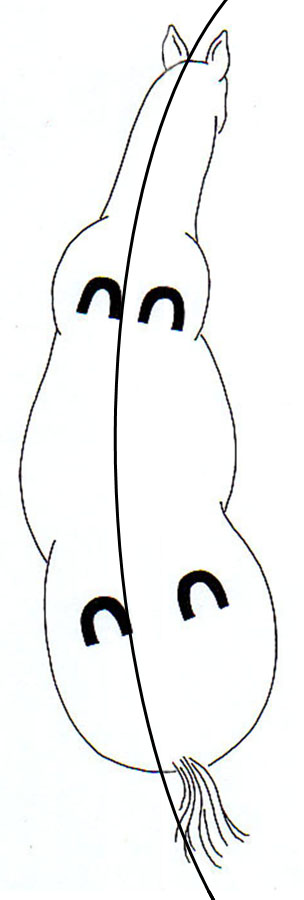
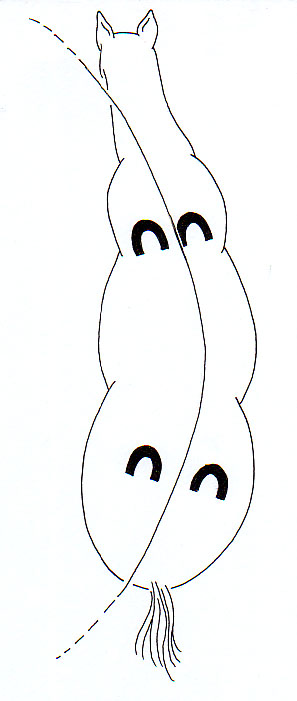
Circling to the right, your horse may tend to tip his nose in easier and bend too much, cocking his rear end into the circle while the circle gradually enlarges (see Diagram 4).  
 

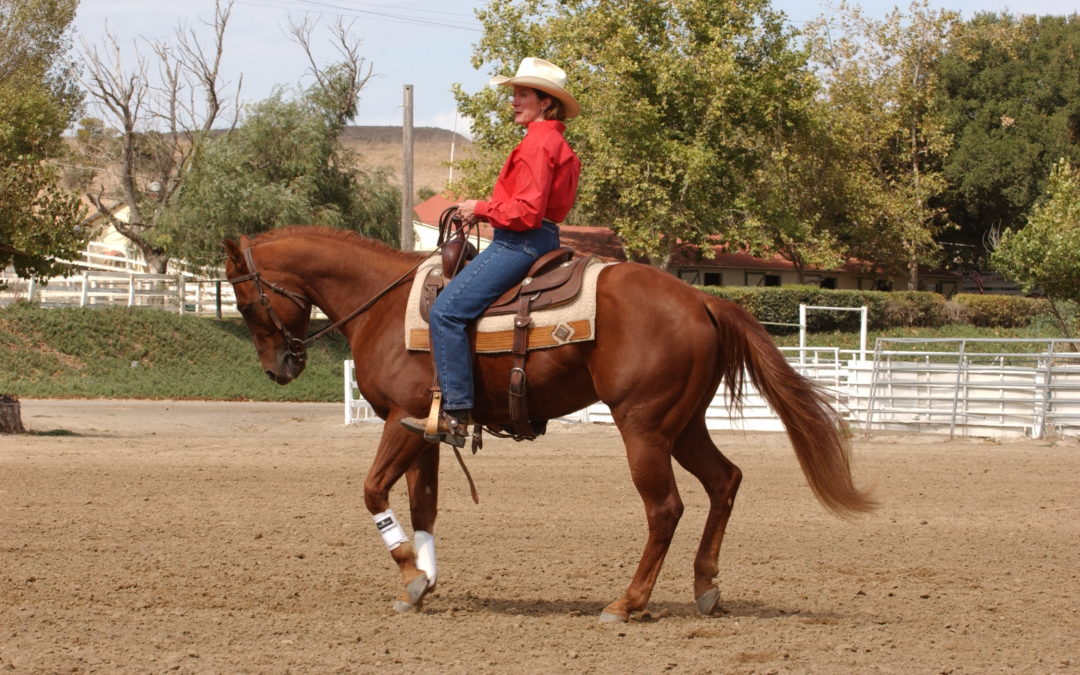
To correct this, apply your inside (right) leg behind neutral position to push his rear end back out onto the track of the circle. At the same time, keep enough tension on the outside (left) rein to keep his shoulder from drifting out to the left, straightening out his neck a bit so you can just see the corner of his right eye. Apply your left leg at the cinch; that will also help to keep that shoulder from drifting.(see photo 1) 

Dealing With the Stiff Side 

Circling to the left, your horse may tend to resist bending, keeping his body relatively straighter and resisting bringing his nose to the inside (see Diagram 3). Instead, he’ll lead with his inside (left) shoulder, letting his hind end drift out while the forehand somewhat collapses the circle. 

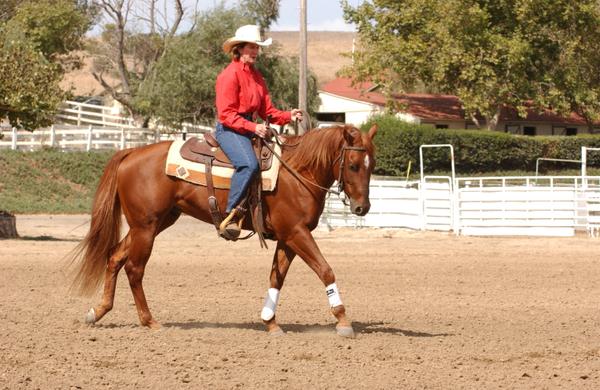
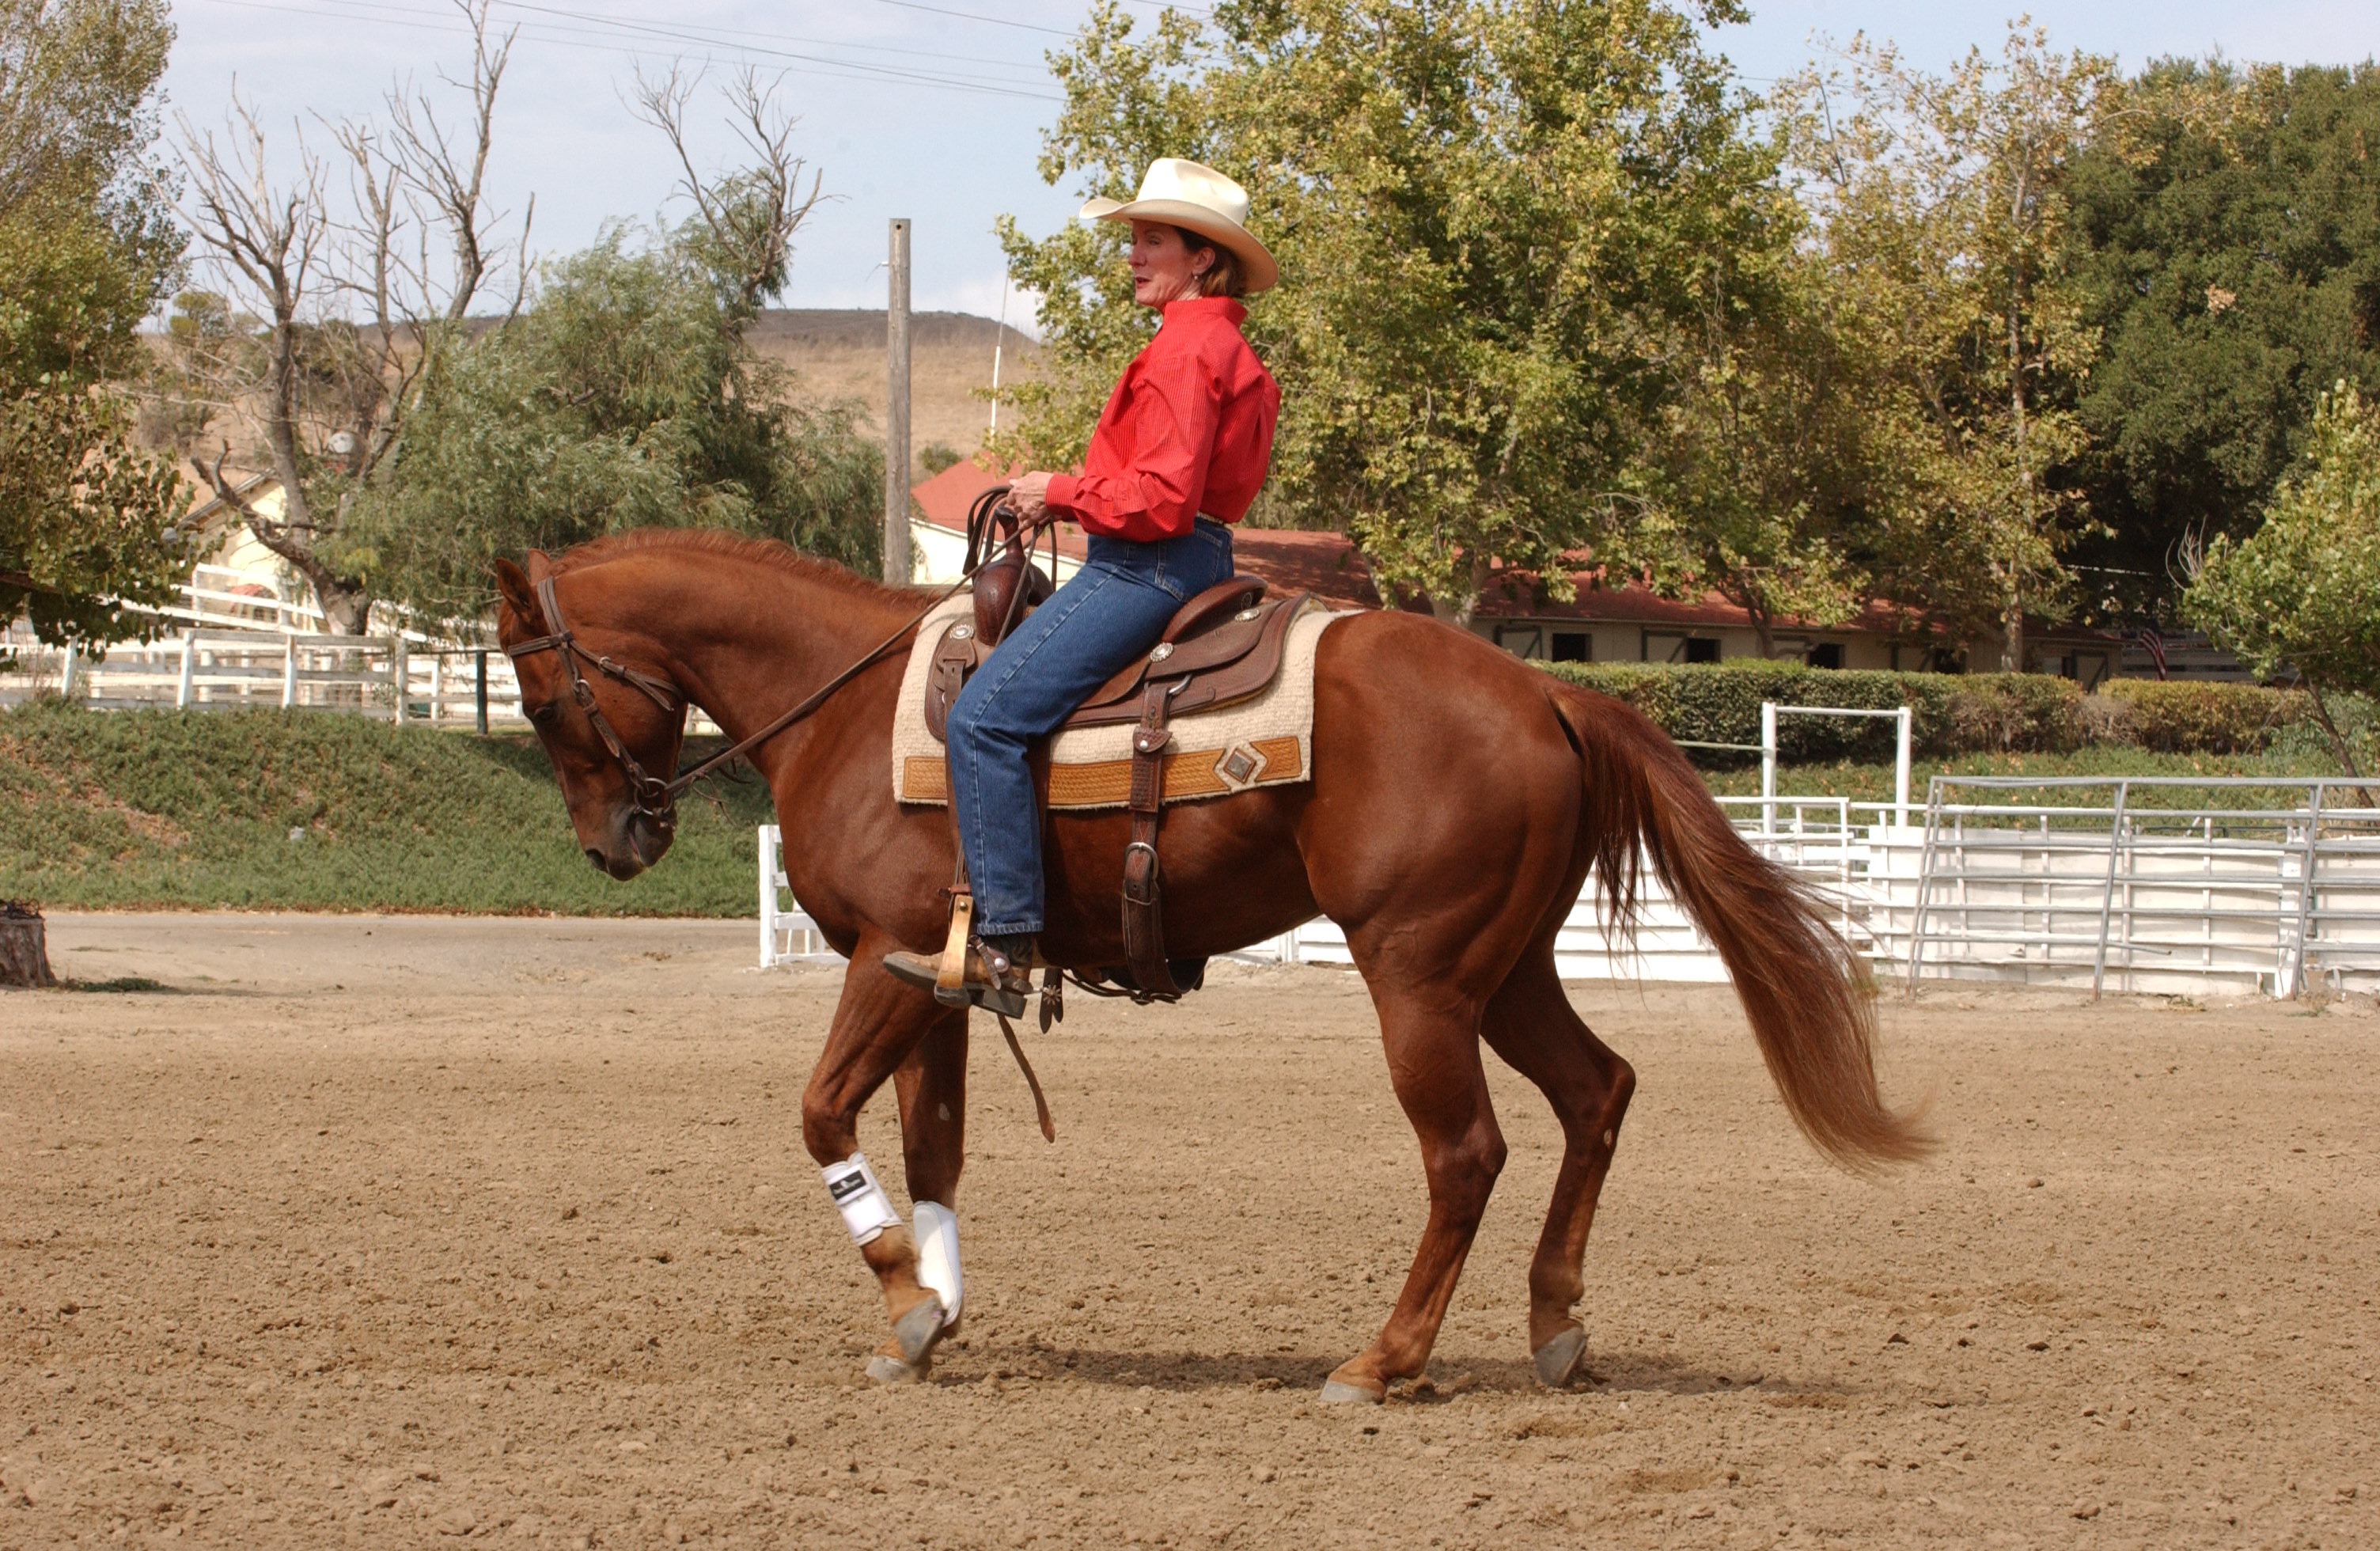
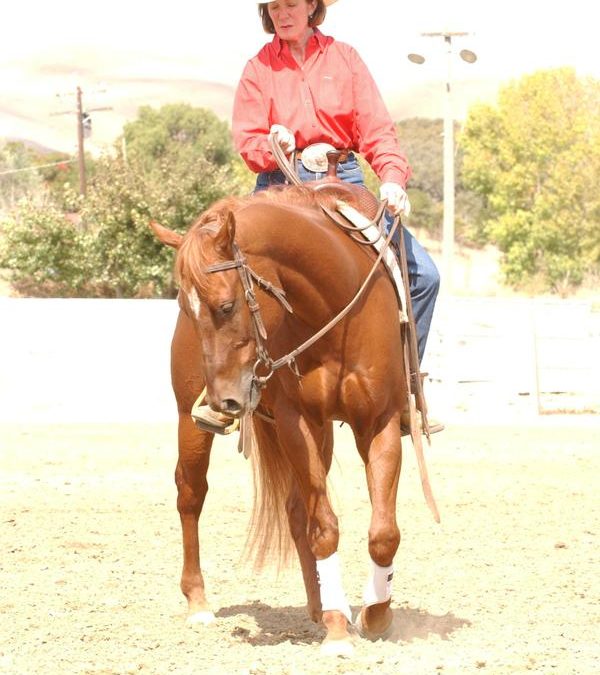
To correct this, pick up his inside shoulder with a move I call “key in the ignition.” (See photo 2) Bring your inside (left) rein hand close to his neck, then twist your wrist as if you’re turning a key in an ignition, so that your palm comes to face upward, making your pinkie finger closest to the neck (do not bring your hand over the neck or withers, a common error). This tightens the rein slightly while giving a “lifting” motion that helps lift the shoulder on that side. 

At the same time, apply pressure with your inside (left) leg in neutral position (that is, directly behind the cinch) to encourage more bend, while pulling your outside (right) rein slightly outward to the right, moving his shoulders out to the right to help stop the forehand from collapsing in on the circle. If necessary, use your right leg a few inches behind neutral position to keep his hindquarters from moving out. 

As you strive to keep him aligned to the arc of the circle in either direction, remember also to keep him giving his face (that is, staying soft to your hand) and using both your legs to keep him moving forward at a steady pace. 

LET US KNOW YOUR THOUGHTS 

Troubleshooting Softening the Face – Reining Essential #1, part 2

Troubleshooting Softening the Face – Reining Essential #1, part 2

This is a continuation of the article I wrote called Reining Essential #1 Giving the Face. I’m going to do a quick recap and then get right into “troubleshooting” softening the face.​​​​​​​​​​​​​​

Reining Essential #1- Recap

1. Giving the Face

“Giving the face” means softening in the jaw and flexing willingly at the poll in response to light pressure on both reins, or flexing to the left or right in response to left- or right-rein pressure. It’s the single most important thing to teach your horse.

Reining Essential #1-Troubleshooting

With each thing that we teach a horse, many responses will come up. Some of those are good and some not so desirable. I’ll include a Troubleshooting section for each of these. I will also do a “myth busting” segment for each of the Essentials.

Troubleshooting. Common problems in getting your horse to give his face, and how to fix them:

  • Overbridling (chin to chest). Fix by using more leg and less rein, being sure to release when your horse softens. Also, if need be use distinct upward tugs on the reins to make it uncomfortable when he puts his head beyond the vertical or too low, returning to soft hands as soon as he corrects his positioning. 

  • Underbridling (not flexing enough, his neck may be raised and braced against your hands). Fix by bumping incrementally harder with your legs in neutral position while holding with your hands as assertively as need be until there is the slightest indication of giving, then release immediately, then repeat.

  •  Never fully softening the jaw (you’ll feel him still pulling on you even though he’s dropped his head). Fix by tugging the reins off the beat of his motion. Be sure not to tug predictably, or he may simply learn to move his head from side to side without truly giving/softening. Also, make sure the slack is out of the reins before you tug, so you’re never jerking.

  • Wiggling (his rear end drifts off to one side or the other instead of driving up underneath his body). Fix by riding assertively, bumping simultaneously with both legs in neutral position or just behind the cinch. Push him up into the “wall” of your hands to straighten him out.​​​​

Softening your horse is an ongoing and continual process. It will never end, and it’s the first thing that goes, if we’re not paying attention! 

One percent improvement a day is a great goal.

LET US KNOW YOUR THOUGHTS 

Softening the Face: Reining Essential #1

Softening the Face: Reining Essential #1

There are a few things every horse should be able to do before going on to specialize in any discipline. These are the things we “put on” a colt in the first 60 to 90 days of his training; they’re also what we use to tune up an older horse or “fix” a problem horse. They are the foundation for all that we do.

I call them the Seven Essentials. They are:

1. softening the face;
2. walking a circle;
3. walking a counter-arc circle;
4. backing up;
5. responding to “whoa”;
6. moving off your leg

7. pivoting on the hind end

They sound very simple, and they are. Perfecting them can be another story though!

My philosophy of progress by tiny increments (remember—as little as 1 percent a day!) is critical here. Extra time spent nailing these basics will pay you terrific dividends as you move forward. So, go slow; tackle them in this order, and take the time it takes to get them right.

Reining Essential #1: Softening the Face

“Softening the face” means softening in the jaw and flexing willingly at the poll in response to light pressure on both reins, and flexing to the left or right in response to left- or right-rein pressure. It’s the single most important thing to teach your horse.

Why? Because it’s how you and your horse both know that you are in control. By softening through the jaw and flexing at the poll, your horse says, “I’m yours. What do you want me to do?” If, on the other hand, he even thinks that “putting his head on upside down” (that is, lifting his head and bracing with his neck) is an option, then you don’t have control of his mind or his body. And that can be downright scary on a thousand-pound animal!

Just as the Seven Essentials are the key to all reining maneuvers, giving the face is the key to the rest of the

Seven Essentials. That’s why it’s where we begin. I’ll start by describing exactly what you’re striving for.

The goal. Ultimately, your horse should stay soft and flexed in response to your picking up the rein, so that his face is essentially at the vertical, or more or less perpendicular to the ground. You should never feel him pulling on your hands.

Ideally, he’ll ultimately remain soft even with a little slack in the reins.

If you ask him the way I’m going to describe, using your legs to keep his hind end engaged, he should over time begin to round his topline, too, reaching far up underneath himself with his hind legs (what I call “shortening the wheelbase”). He should stay relaxed, rather than getting agitated. Eventually, you’ll feel him getting better balanced under you.

Timing is critically important. Remember, your horse learns from the release of pressure (the reward), not the application of it (the pull). Also, he assumes what he was doing immediately before a reward is what he’s being rewarded for. So to reward that very first “give,” release pressure and praise him the instant you feel him respond.

If your horse is really green, you might start from the ground facing him, and do the exercise below, before doing it when you’re on him.

With your hands about 12 to 24 inches apart, first draw back gently but firmly with both reins, drawing the bit from side to side gently if need be to get your horse to flex at the poll, drop his head, and soften. Release pressure and praise him the instant he responds (make sure he’s actually “giving” to you—softening to your hand–and not just dropping his head, or just moving it back and forth), then repeat.

To ask for the lateral flexion, slide your hand halfway down one rein, then draw your hand back in a pull-and-release motion toward your waist. Try to get your horse to volunteer that last little bit of bend, then loosen the reins and praise him. Repeat several times, then do the same exercise with the other rein.

Repeat these flexing exercises each time you mount and before you begin your riding sessions.

At a walk, trot, lope. When he’s becoming solid in his flexing at a standstill, try it at a walk using your legs to keep him moving forward.

Then, ask for flexion to the side, move him onto a small circle using your inside leg in neutral position to encourage him to bend through his body as your inside rein asks him to flex his neck to the inside. The bend in his neck should enable you just to see the corner of his eye.

When he’s responding well at a walk, try it at a trot, and then a lope, using the same approach (you’ll need slightly larger circles at the faster gaits). Remember—you’re using your legs to create impulsion up into the bridle.

Putting it all together. An exercise to combine all the learning focuses on transitions, which are a great place to work on flexion. So practice getting and keeping flexion going from a trot to a lope to a trot, then down to a walk for a step or two, then stop and back up. Strive for softness in the transitions—especially the downward ones, as from a lope to a trot and a trot to a walk. Mix it all up and do it a lot! ​​​​​​​

relaxed

LET US KNOW YOUR THOUGHTS